How to Make the Half Double Crochet or HDC Stitch
The left-handed half double crochet is easily a favorite stitch for many crocheters. Its size is between a single crochet and a double crochet stitch. Abbreviated as HDC, the half double crochet stitch is a versatile stitch that is found in all kinds of crochet projects.
Once you mastered the half double crochet stitch, I hope you’ll try some of the variations I show you later on in this tutorial. By the end of this tutorial, you will be ready to tackle any half double crochet stitch projects.
What is a Left-Handed Half Double Crochet Stitch?
The left-handed half double crochet stitch is actually the same stitch that right-handed crocheters make, however, you’re making it left-handed instead of right-handed. So the stitches aren’t different, they are simply mirror images of each other.
I consider the half double crochet to be 1.5 stitches tall. It’s taller than the single crochet but shorter than a double crochet stitch.
This stitch is one of the four basic stitches every crocheter should know.
Note that in UK terms, this stitch is called the half treble crochet. It’s still worked the exact same way, just with a different name. If you need more help remembering the different stitch equivalents, I created a handy guide for US to UK term conversions.

How to Get Started with the Half Double Crochet Stitch
Before you can make any half double crochet stitches, you need the right materials.
- Yarn, any kind (or as defined by your pattern)
- Crochet hook (defined by your pattern or reference the yarn label for a recommended hook size)
- Yarn needle and scissors
Tips for Successfully Making the Half Double Crochet Stitch
When making the half double crochet stitch, make sure you find a way to hold your hook and project that is comfortable to you. Since it’s a beginner stitch, definitely take the time to practice it a lot until you are confident with it. You will likely find a lot of patterns out there using this stitch or a variation of it.
Remember that crocheting left-handed is the same as for right-handed makers, except that you are making a mirror image of each other. If you have a right-handed crocheter willing to give you some lessons, sit across from them as if you are in front of the mirror. Sitting side-by-side might prove more challenging since their way will look a bit backward to watch.
If you feel like you are struggling with this stitch, try going slower and adjust your yarn or hook size if needed. Sometimes swapping your hook for a different size can make all the difference.
Steps for Making the Half Double Crochet Stitch Left-Handed
Make the Foundation for a Half Double Crochet Stitch
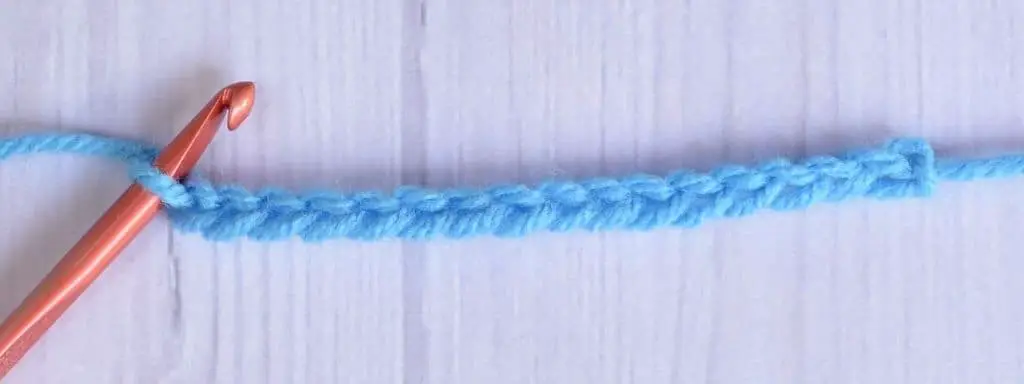
Before you can actually make a half double crochet stitch, we need to form a slip knot and create a foundation chain. If you are making a swatch of hdc stitches, I recommend making about 20-25 chains so that you can have a large enough swatch to see your stitches.
Written Directions for the Half Double Crochet Stitch
To make sense of the steps, let’s take a look at the text description of how to make the half double crochet stitch. Then, I’ll break it into each part so that you can see try it yourself.
Yarn over and insert the hook, yarn over and pull up a loop, yarn over and pull through three loops.
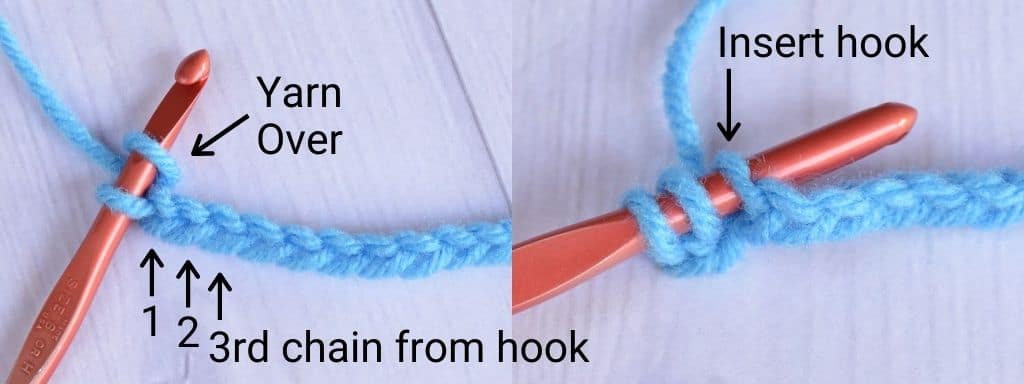
Step 1: Yarn Over, Insert the Hook
Holding the hook with your left hand and yarn in your right, yarn over, which means to wrap the yarn from back to front around your hook.
Then insert your hook into the third chain from your hook. Your hook will be sticking through to the backside of the foundation chain.
Note: If you are following a pattern, insert your hook into the chain designated in the pattern.
Step 2: Yarn Over, Pull Up a Loop
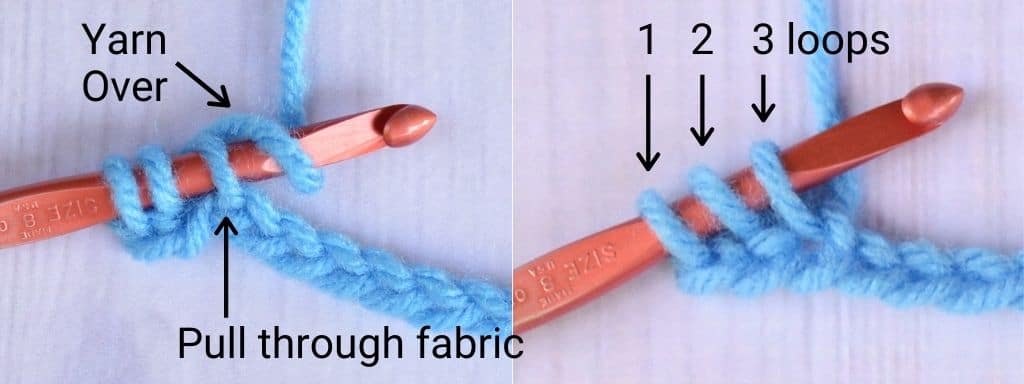
While your hook is still sticking through to the back of the fabric, yarn over again and pull your hook back through to the front side of the fabric. While you’re pulling it through, use the mouth of your hook to bring the yarn with you. This motion of bringing yarn from the backside to the front side of the fabric is called “pulling up a loop.”
You will have three loops on your hook.
Step 3: Yarn Over, Pull Through All Three Loops
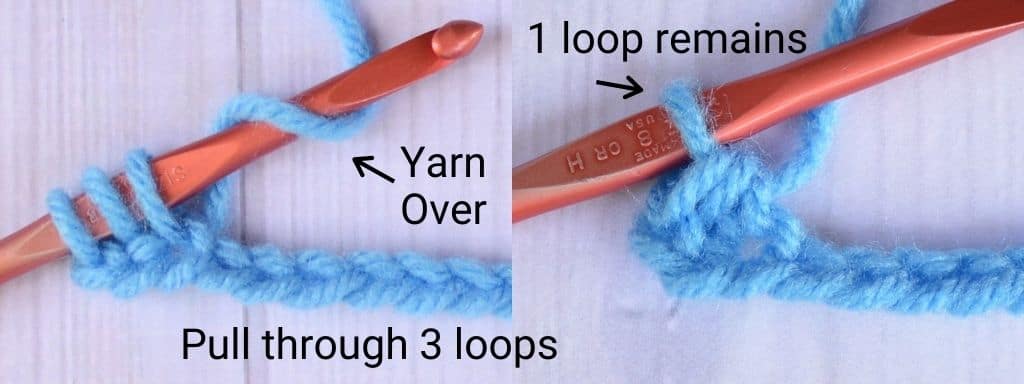
The final step in making a half double crochet stitch is to yarn over again. Then, using the mouth of your hook, pull the yarn through all three loops on your hook. You will be left with a finished hdc stitch and one loop on your hook.
Common Questions About the Half Double Crochet Stitch
What Does the First Row of Half Double Crochet Stitches Look Like?
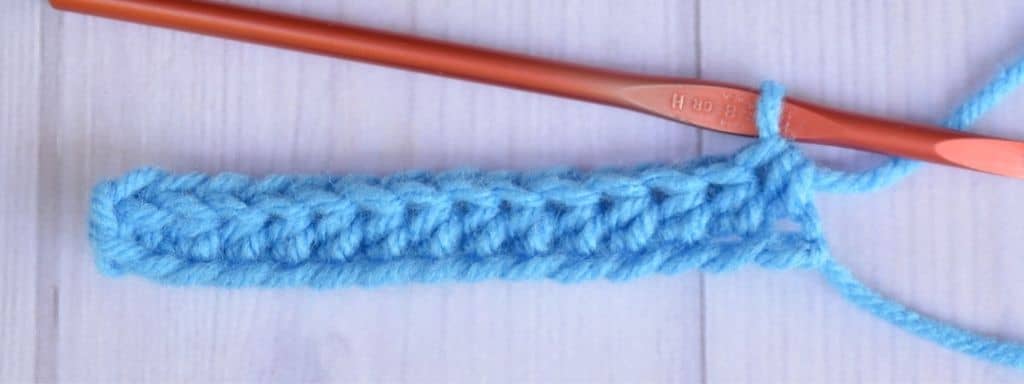
The half double crochet stitch is one of my favorite stitches. You can see here in the first row of hdc that the stitches have really pretty texture to them already. That’s caused by the yarning over you did in step one of this stitch.
How Do You Transition to the Second Row of Half Double Crochet Stitches?
When following a pattern, always follow the pattern’s directions for how to transition to each new row. However, if you are creating your own work, there are some general standards for transitioning to each new row, depending on the stitch you are using.
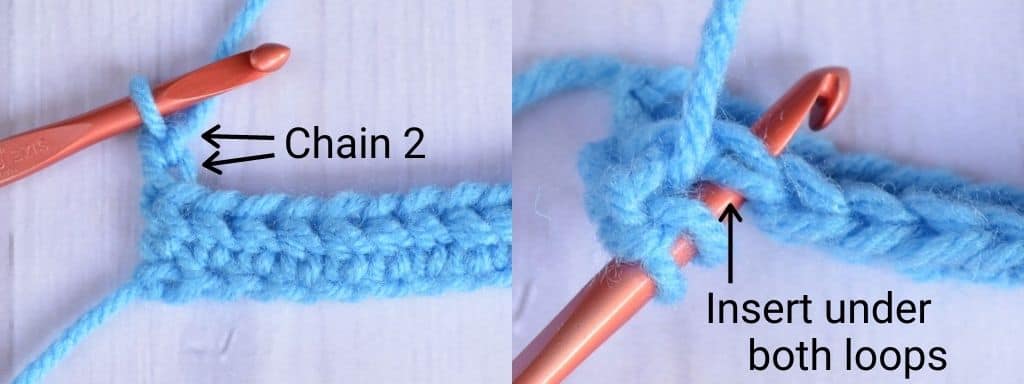
Transition stitches, called turning chains, are made to grow your work another row taller. So in general, you need to make a number of turning chains equal to the height of the next row of work. For half double crochet stitches, I find that two turning chains will give you the right amount of height.
Additionally, your pattern will inform you where to put the first half double crochet in the second (or subsequent) rows. A lot of times, the turning chains will count as your first stitch, so your first half double crochet will actually go into the second stitch.
How Do You Finish Off a Project With the Half Double Crochet Stitch?
When you’re ready to finish your project or swatch of half double crochets, typically you will “fasten off” and weave in your ends. To fasten off your yarn, first, you need to cut the yarn away from the skein, leaving a tail about 6-8″ from the end of your work.
While your hook is still on your project, make a chain. Then, continue to pull your hook upward until that tail comes all the way through your work. Next, pull the tail so that the little knot that you created is tightened close to your project.
Then, using your yarn needle, weave the yarn into the fabric so that it secures itself and disappears into your work. My tip is to weave the yarn through several stitches, going in the direction of the stitches. Go in multiple directions so that the yarn gets locked in and unlikely to come unraveled in the future (especially for projects that will get washed or manipulated a lot – think blankets, scarves, etc.).
Once you’re thoroughly weaved in your yarn tail, use your scissors to trim the yarn close to your fabric. Be careful not to cut the fabric itself.
What Are the Variations That Can Be Done With the Half Double Crochet Stitch?
Once you get the hang of the regular half double crochet stitch, I encourage you to try one of these variations listed below. To create any of them, you need to follow steps 1-3 above, but the variation happens when you insert your hook in step 1.
Half Double Crochet in the Front Loops Only (FLO)
Just like the directions say, instead of inserting your hook under both loops, simply insert your hook under the front loop only. The front loop is the one that is on the front side of the fabric. Note that when you turn your work, the front loop becomes the loop that is on the side of the work that you are working. The front loop is relative to the side of the work you are working on. This variation creates a really subtle texture. It’s not raised like the others below, but it is a beautiful visual change.
Half Double Crochet in the Back Loops Only (BLO)
Alternatively, you can create a completely different look by inserting your hook into the back loop only. This will leave a subtle ridge of texture in each row. And you can try various forms of alternating FLO and BLO half double crochet rows or even alternating stitches for completely unique textures.
Front Post Half Double Crochet (FPhdc)
Another variation of the half double crochet stitch is where you insert your hook around the post of the stitch in the row below. The post is the body of the stitch, below where the loops are. In this case, you can insert your hook under the front of the post to create a ribbed effect.
Back Post Half Double Crochet (BPhdc)
Crocheting around the back post can be a little tricky to manipulate, but once you get the hang of it, you’ll feel right at ease. To create the back post crochet stitch, tilt your work so that you can see the back of the fabric. Then you can use your hands to push the post away from the fabric so you can see where to insert your hook. This kind of stitch creates a great ribbed texture.

The Last Thing You Need to Know About the Half Double Crochet Stitch
I hope you are getting the hang of the half double crochet stitch. This stitch is really versatile and great for beginners. But don’t let a beginner stitch fool you. There are so many patterns out there that use the hdc or a variation of it, so be sure to practice until you feel comfortable with it.
Also, it’s best to practice this stitch until you can create stitches and rows that are of equal size and tension.
Want more practice with the half double crochet stitch? Check out these fun crochet projects
I’d love to see what you make with the half double crochet stitch! Connect with me on Facebook and Instagram and show me your work. To learn more crochet stitches, be sure to visit the stitch tutorial library.


Leave a Reply