
Woohoo! You’ve made it all the way through the Halloween Mosaic Blanket Crochet Along, and now it’s time for the final touch – the crochet envelope border! This is the part that pulls everything together, wraps up those yarn tails, and gives your blanket that crisp, finished look we all love.
I’ve always thought of the border as the moment when a project really comes to life. I love when all those spooky stitches, bright colors, and long hours finally come together into something you can snuggle under (or proudly show off!). And if you’re like me, you’ll love that this border is as practical as it is pretty – no weaving in a mountain of yarn tails here!
This post may contain affiliate links. If you use these links to buy something, I may earn a small commission. Affiliate links help me continue to provide free content at no extra cost to you.
Featured in through the Halloween Mosaic Blanket Crochet-Along
Keep reading to find the free written instructions. Prefer a printable or tablet-friendly PDF? Get the ebook.

Introducing the Mosaic Crochet Envelope Border
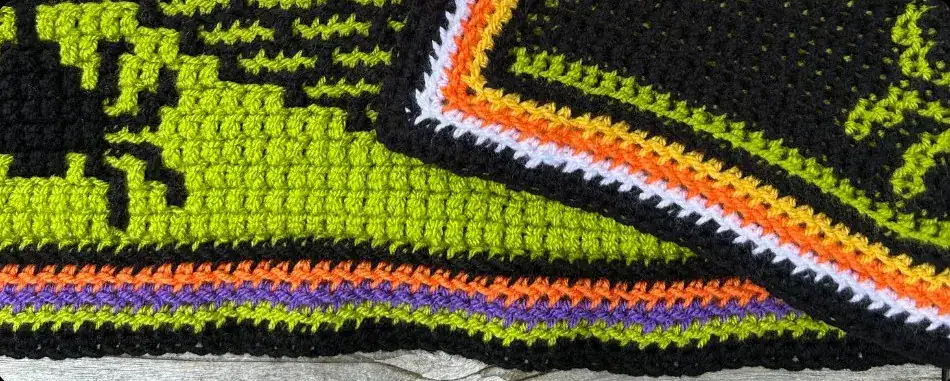
When I designed this border, I wanted it to reflect everything that makes this blanket so much fun – bold colors, Halloween charm, and a little bit of texture. The back side is worked in classic candy corn shades, while the front features bright stripes of orange, purple, and green, all framed with black yarn to tie it together.
Each round is worked in the back loop only, which gives the border a neat look without taking away from the blanket’s detailed mosaic designs. And since it’s an envelope border, all those yarn tails are tucked neatly inside – no weaving required (which might just be the best part!).
Of course, you can make the border your own! Try using solid colors for a clean look, or play around with different stitch combinations if you want something extra textured. There’s no wrong way to finish it – this is your chance to add a personal touch and make your Halloween blanket uniquely yours.
Video Tutorial for the Halloween Mosaic Crochet Blanket Section
There are both right-handed and left-handed video tutorials to help you crochet this envelope border.

About the Stitches
Before you can crochet the envelope border, here are some details you need to know.
Skill Level: Intermediate
Materials:
- Size 3 Weight, Stylecraft Special DK 100% Acrylic Yarn (Alternate: Hobby Lobby I Love This Yarn! Sport 100% Acrylic, Patons Astra 100% Acrylic, King Cole Big Value DK 100% Acrylic)
- Color A – Apple (Green) – 20 yards
- Color B – Black – 95 yards
- Color C – White – 20 yards
- Color D – Dandelion (Yellow) – 19 yards
- Color E – Spice (Orange) – 37 yards
- Color F – Proper Purple – 20 yards
- G-6 (4mm) Hook
- Scissors
- Yarn Needle
Gauge: 15 st x 20 rows = 4″ in a swatch of overlay mosaic crochet
Finished Dimensions: Border is approximately 2″ wide (5.1 cm)
Stitch Abbreviations:
- sl st – slip stitch
- ch – chain
- sc – single crochet
- bs – single crochet border stitch
- BLO – back loop only
- FLO – front loop only
Pattern Notes:
- US Terms (US to UK terminology conversion)
- Make two borders – one on each side of the blanket
- The first round of each border is made in the front loop
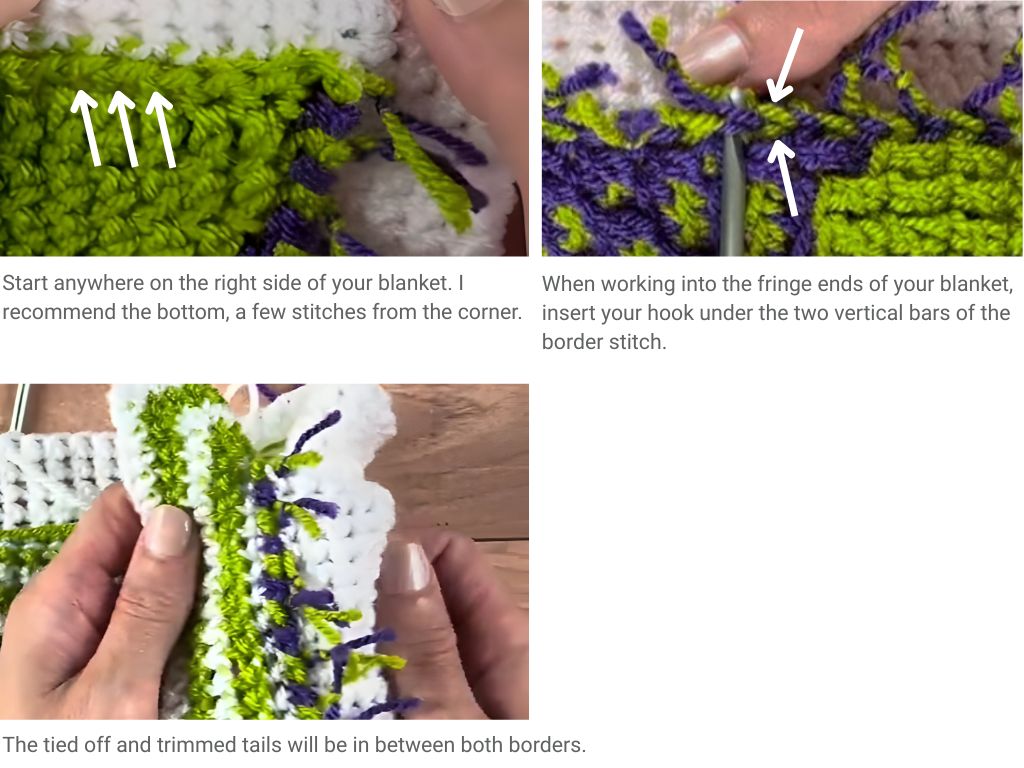
- On the sides with the yarn tails, make sure the yarn tails stay inside both borders
- Close both borders together with single crochet stitches through both loops of both borders
- Each round is worked in a different color
- Fasten off at the end of each row
How to Make The Halloween Mosaic Crochet Envelope Border
The envelope border is used to hide all of those yarn tails without the need to weave them in. You will work two borders, one on each side of the blanket, and then crochet them together, sealing in the ends.
You can customize the border with any variety of stitches. The sample blanket uses the same stitches on each side, and five rounds before joining the borders together.
Make the Wrong Side (WS) Border
Round 1 (WS): Join Color B to the front loop of a stitch on the bottom of the blanket, on the Wrong Side of your blanket. FLO sc in each stitch around, “sc, ch 1, sc” in each corner. Sl st to join at the end of the round.
Round 2 (WS): Join Color D, ch 1, BLO sc in each st around, with “sc, ch 1, sc” in each corner. Sl st to join at the end of the round.
Round 3 (WS), Join Color E, repeat Round 2.
Round 4 (WS): Join Color C, repeat Round 2.
Round 5 (WS): Join Color B, repeat Round 2. Fasten off.

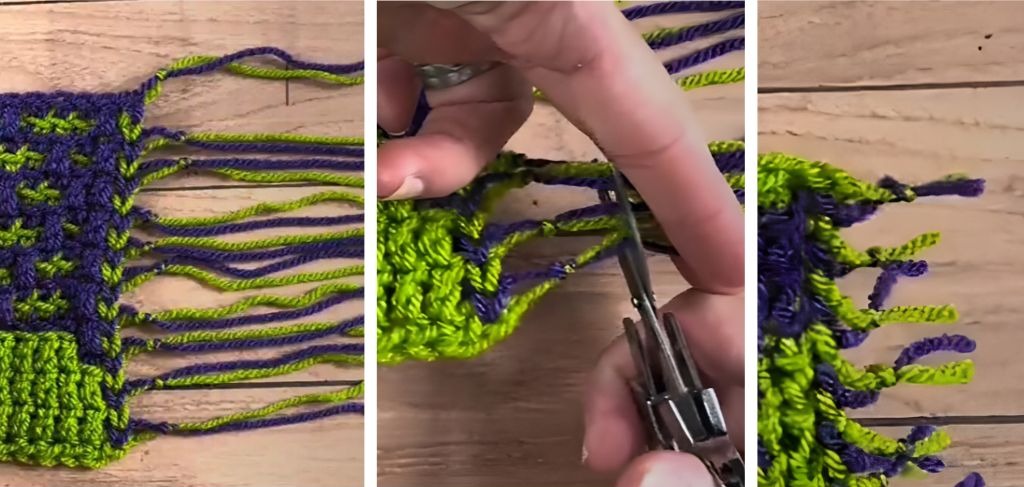
Tie off and trim the fringe
Take two tails and tie them together in a knot. You can hold both tails together and wrap them around your fingers to make a tidy knot.
You may find it easier to tie and trim the fringe after you make the back border, but it can be done in any order. Additionally, you can place the knot close to the edge of your border stitches. When cutting the tails, leave roughly 0.5-1 inch (2-2.5 cm) of tails after the knot to ensure they don’t come undone.
Make the Right Side (WS) Border
Round 1 (RS): Join Color B to the front loop of a stitch on the bottom of the blanket, on the Right Side of your blanket. FLO sc in each stitch around, “sc, ch 1, sc” in each corner. Sl st to join at the end of the round.
Round 2 (RS): Join Color D, ch 1, BLO sc in each st around, with “sc, ch 1, sc” in each corner. Sl st to join at the end of the round.
Round 3 (RS), Join Color F, repeat Round 2.
Round 4 (RS): Join Color A, repeat Round 2.
Round 5 (RS): Join Color B, repeat Round 2. If using this color for the closure round, do not fasten off.
Close the Envelope Border
On the Right Side, using Color B, ch 1, sc in each st around by going under the top loops of both the front and back borders, “sc, ch 1, sc” in each corner. Sl st to join at the end of the round. Fasten off and weave in end.

Want to see all the sections in the Halloween Mosaic Blanket CAL? Head back to the main CAL post for details.

Want to Crochet Your Own Spirited Halloween Blanket?

Make your home extra spooky and cozy this fall with a stunning Halloween Mosaic Blanket. The full pattern eBook includes:
- 13 different mosaic patterns combine to make one beautiful blanket
- Written instructions
- Pattern charts
- Photo and video tutorials
More Halloween Patterns You Will Love to Make
I love seeing your finished projects! If you enjoyed making this mosaic crochet envelope border for your Halloween blanket, I’d love to see yours on Instagram. To be sure I don’t miss it, please tag me @remingtonlanecrochet when you share your photos!


Copyright 2020-2026 Remington Lane Crochet, LLC. This pattern and its images are copyright protected and the sole property of Remington Lane Crochet LLC. Please do not redistribute, transfer, or sell the pattern, or alter it to claim as your own.
You may sell any products you create from this pattern. Please credit the designer by linking online listings to https://remingtonlane.com/ or by tagging @remingtonlanecrochet

Leave a Reply