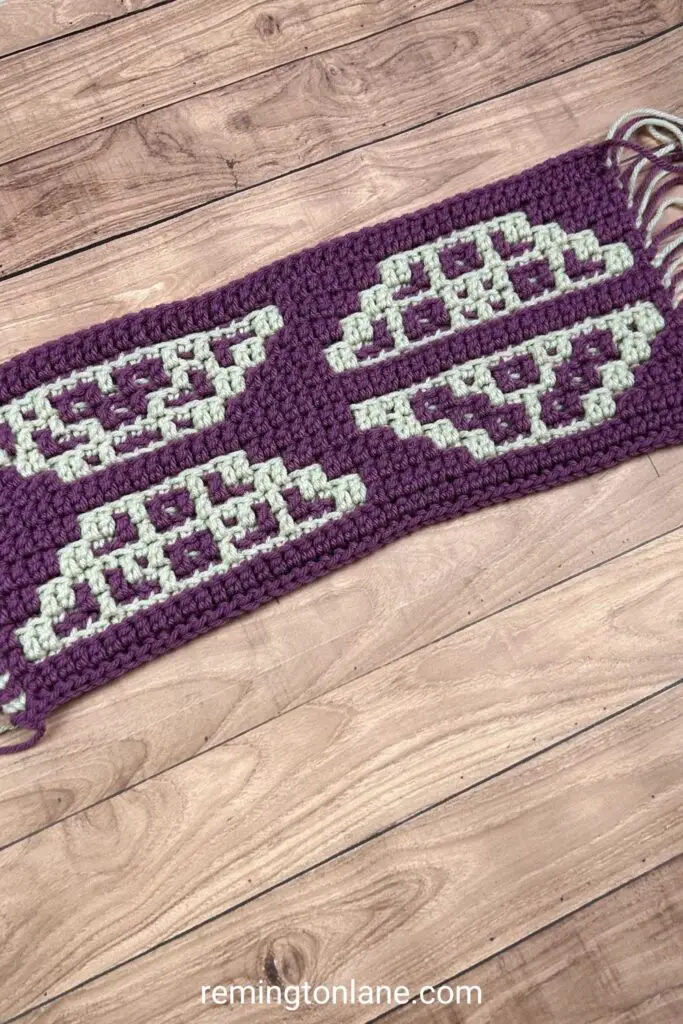
Are you ready for Section 3 of the Mosaic in a Month Blanket crochet-along?
If you’re new to overlay mosaic, it is not as hard as it looks. There are some tutorial videos linked below from Erin at Juniper & Oakes. They will walk you through all of the details for how to read teh chart and make the stitches.
This post may contain affiliate links. If you use these links to buy something, I may earn a small commission. Affiliate links help me continue to provide free content at no extra cost to you.
Featured in through the Mosaic in a Month Blanket Crochet-Along hosted by Juniper & Oakes
Keep reading to find the free pattern chart. Prefer written directions? Get the ebook.
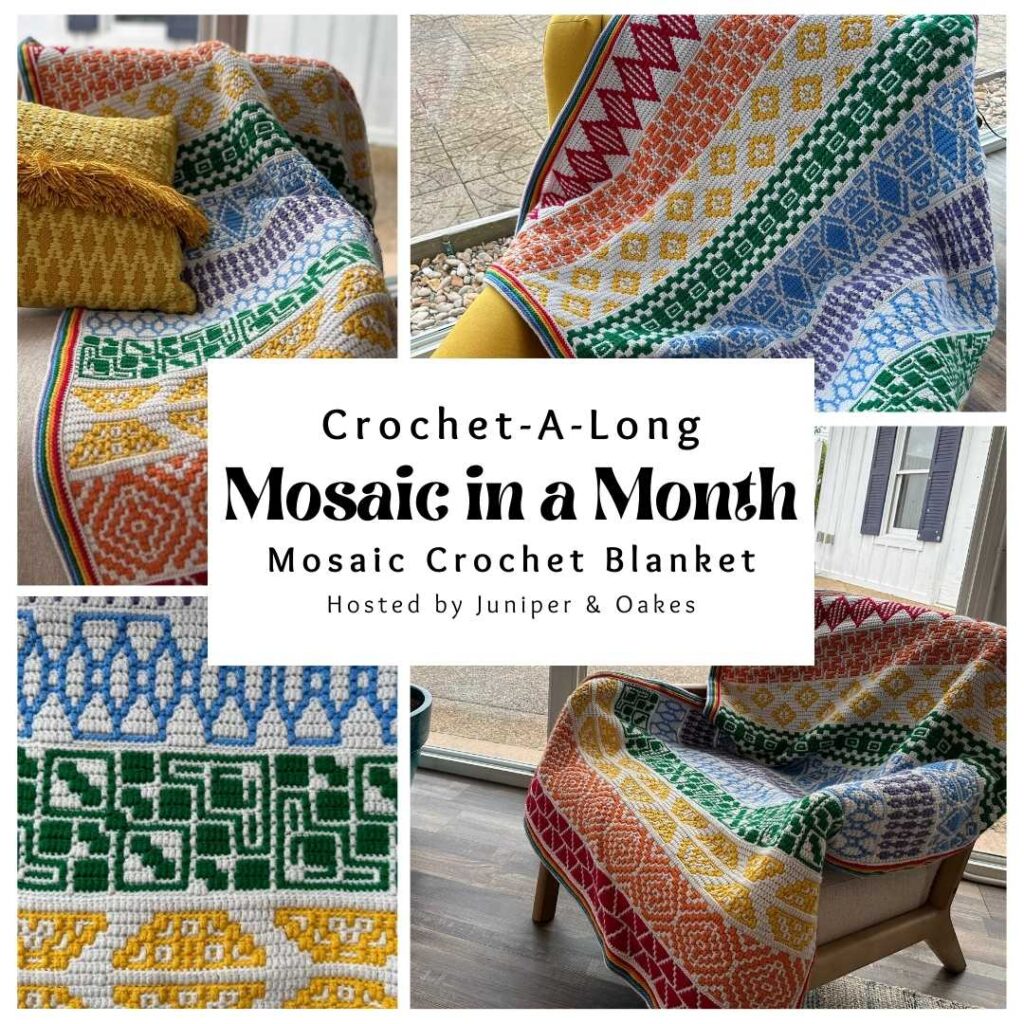
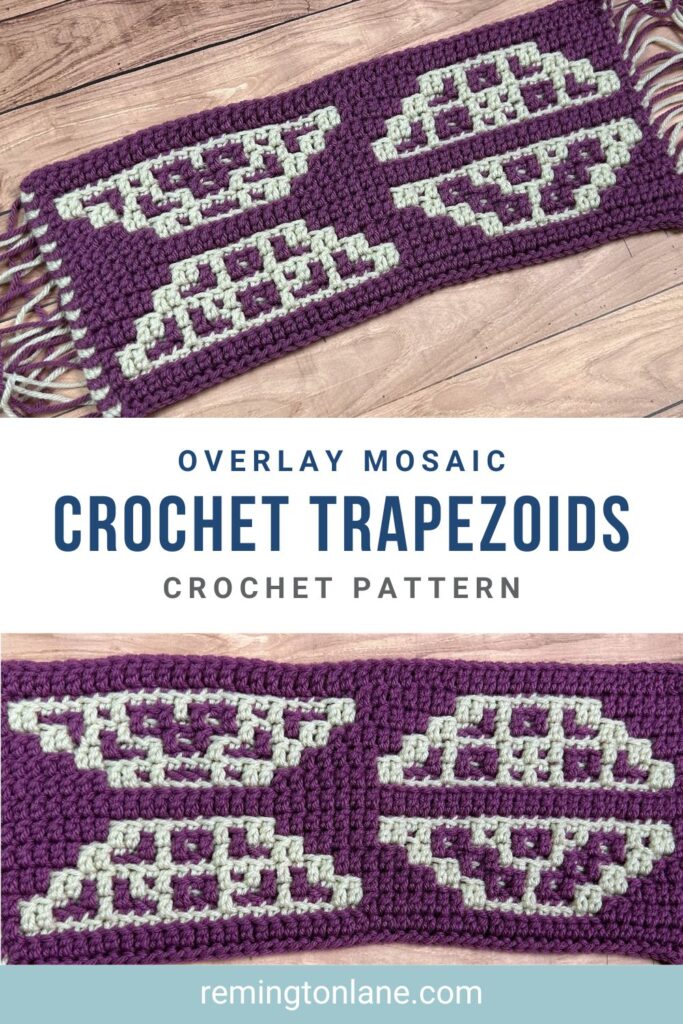
Introducing the Totally Trapezoids Mosaic Crochet Blanket Strip
For my section, it’s all about the trapezoid, if you can’t tell by the name of the pattern. These shapes also include some cutaway designs within them for some added interest. If you look closely, the cutaway designs in each trapezoid of the repeat are completely different designs.
To me, trapezoids are such a fun shape because they have so many different angles and when reversed they can fit together kind of like a puzzle.
You can buy the ad-free, PDF of this pattern in my Etsy shop, Ravelry store, and LoveCrafts.
About the Stitches
Before you can get started with this mosaic strip, here are some details you need to know.
Skill Level: Adventurous Beginner/Intermediate
Materials:
- DK weight yarn, such as Stylecraft Special DK in two colors
- Color A
- Color B
- G (4mm) Hook
- Scissors
- Yarn Needle
Gauge: Make a swatch of the pattern, 23 stitches x 22 rows = 4” x 4” in square
Finished Dimensions: Approximately 37” x 53” for the full blanket in DK weight yarn
Stitch Abbreviations:
- Fsc – foundation single crochet
- ch – chain
- sc – single crochet
- BLOsc – back loop only single crochet
- dc – double crochet
- FLOdc – front loop only double crochet
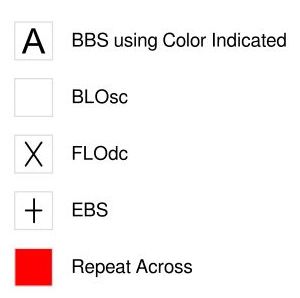
- BBS – beginning border btitch
- EBS – ending border stitch
- RS – right side
Special Stitches (with photo tutorials if needed)
- Beginning Border Stitch (BBS) – A standing sc through the post (or the ‘v’) of the stitch below, ensuring that both legs of the stitch on the Wrong Side (WS) are to the outside of the blanket. (For right-handed crocheters the legs would be secured to the right of the stitch and vice versa for left-handed crocheters.) Click here for a video tutorial.
- Back Loop Only Single Crochet (BLOsc) Insert hook in back loop of indicated stitch, yarn over and pull up a loop, yarn over and draw through both loops on hook.
- Front Loop Only Double Crochet (FLOdc) – yarn over, insert hook in front loop of stitch below the indicated stitch, yarn over and pull up a loop, yarn over and draw through two loops on hook, yarn over and draw through remaining two loops on hook.
- Ending Border Stitch (EBS) – sc through the post (or the ‘v’) of the stitch below, ensuring that both legs of the stitch on the WS are to the outside of the blanket. (Similar to BBS, but the back legs of the stitch are secured to the opposite side.) Click here for a video tutorial.
Pattern Notes:
- US Terms (US to UK terminology conversion)
- Size can be altered by using multiples of 48 + 3
- You may choose to repeat the pattern as many times as you wish. Make sure your Foundation Row is made up of any multiple of 48 plus 3 extra stitches.
- If you are following along with the Mosaic in a Month CAL, the blanket uses 4 repeats, so your foundation row is (4×48) + 3 = 195 stitches.
- Pattern is worked from right to left on Right Side (RS) only. (If you are left handed, feel free to work from left to right according to the chart below).
- Written instructions correspond with reading the chart from right to left
- Each row is worked in a different color
- Fasten off at the end of each row
- Every row begins with a beginning border stitch (BBS)
- Every row ends with an ending border stitch (EBS)
- Sc are worked in BLO of the previous row, unless otherwise noted
- Dc are worked in FLO of stitch 2 rows below, skipping the stitch behind unless otherwise noted
- The patterns include a chart and written instructions below. You may want to refer to each
- The colors on the chart indicate how the finished project will look
- If you are following the Mosaic in a Month Blanket CAL, join the Juniper & Oakes Crochet Community FB Group and share pictures and questions that arise
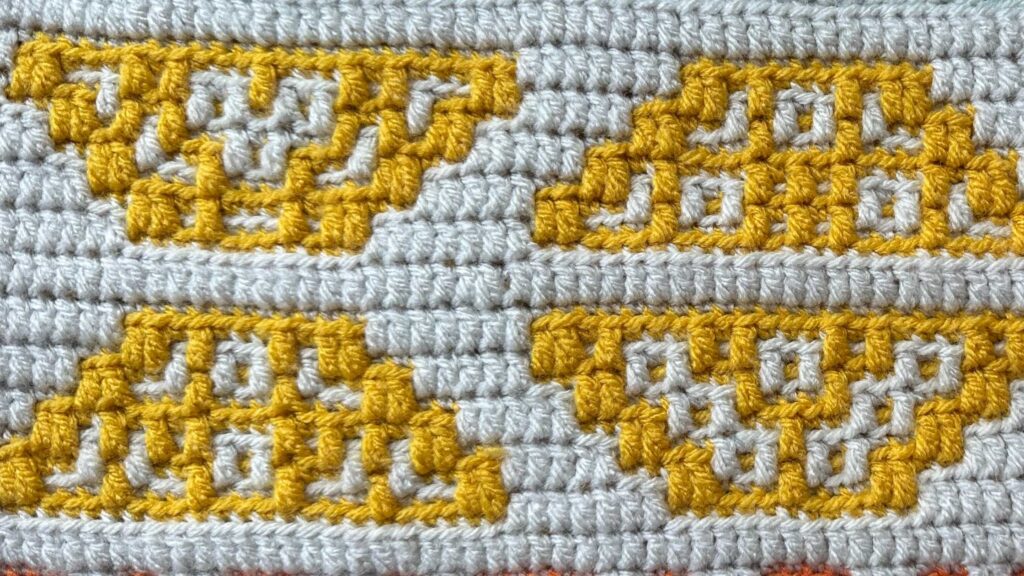
How to Make This Geometric Mosaic Crochet Blanket Strip
Pattern Chart
Row 1-26: For the CAL, refer to the chart below, or continue reading for the written directions (or click here full pattern eBook)
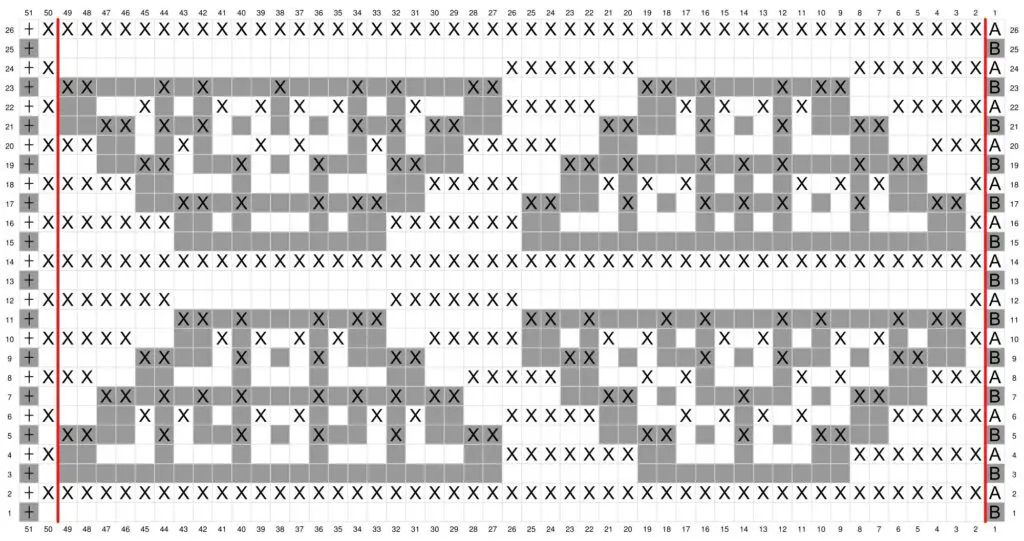
Written Instructions
Row 1: With Color B, BBS in 1st, BLOsc across, EBS in last.
Row 2: With Color A, BBS in 1st, FLOdc across, EBS in last.
Row 3: With Color B, BBS in 1st, *BLOsc x48*, repeat across, BLOsc x1, EBS in last.
Row 4: With Color A, BBS in 1st, *FLOdc x7, BLOsc x11, FLOdc x7, BLOsc x23*, repeat across, FLOdc x1, EBS in last.
Row 5: With Color B, BBS in 1st, *BLOsc x7, FLOdc x2, BLOsc x3, FLOdc x1, BLOsc x3, FLOdc x2, BLOsc x7, FLOdc x2, BLOsc x3, FLOdc x1, BLOsc x3, FLOdc x1, BLOsc x3, FLOdc x1, BLOsc x3, FLOdc x1, BLOsc x3, FLOdc x2*, repeat across, BLOsc x1, EBS in last.
Row 6: With Color A, BBS in 1st, *FLOdc x5, BLOsc x4, FLOdc x1, BLOsc x1, FLOdc x1, BLOsc x1, FLOdc x1, BLOsc x1, FLOdc x1, BLOsc x4, FLOdc x5, BLOsc x4, FLOdc x1, BLOsc x1, FLOdc x1, BLOsc x3, FLOdc x1, BLOsc x1, FLOdc x1, BLOsc x3, FLOdc x1, BLOsc x1, FLOdc x1, BLOsc x4*, repeat across, FLOdc x1, EBS in last.
Row 7: With Color B, BBS in 1st, *BLOsc x5, FLOdc x2, BLOsc x5, FLOdc x1, BLOsc x5, FLOdc x2, BLOsc x7, FLOdc x2, BLOsc x1, FLOdc x1, BLOsc x1, FLOdc x1, BLOsc x1, FLOdc x1, BLOsc x3, FLOdc x1, BLOsc x1, FLOdc x1, BLOsc x1, FLOdc x1, BLOsc x1, FLOdc x2, BLOsc x2*, repeat across, BLOsc x1, EBS in last.
Row 8: With Color A, BBS in 1st, *FLOdc x3, BLOsc x4, FLOdc x1, BLOsc x1, FLOdc x1, BLOsc x5, FLOdc x1, BLOsc x1, FLOdc x1, BLOsc x4, FLOdc x5, BLOsc x19, FLOdc x2*, repeat across, FLOdc x1, EBS in last.
Row 9: With Color B, BBS in 1st, *BLOsc x3, FLOdc x2, BLOsc x5, FLOdc x1, BLOsc x3, FLOdc x1, BLOsc x5, FLOdc x2, BLOsc x7, FLOdc x2, BLOsc x3, FLOdc x1, BLOsc x3, FLOdc x1, BLOsc x3, FLOdc x2, BLOsc x4*, repeat across, BLOsc x1, EBS in last.
Row 10: With Color A, BBS in 1st, *FLOdc x1, BLOsc x4, FLOdc x1, BLOsc x1, FLOdc x1, BLOsc x3, FLOdc x1, BLOsc x1, FLOdc x1, BLOsc x3, FLOdc x1, BLOsc x1, FLOdc x1, BLOsc x4, FLOdc x5, BLOsc x4, FLOdc x1, BLOsc x1, FLOdc x1, BLOsc x1, FLOdc x1, BLOsc x1, FLOdc x1, BLOsc x4, FLOdc x4*, repeat across, FLOdc x1, EBS in last.
Row 11: With Color B, BBS in 1st, *BLOsc x1, FLOdc x2, BLOsc x1, FLOdc x1, BLOsc x3, FLOdc x1, BLOsc x1, FLOdc x1, BLOsc x3, FLOdc x1, BLOsc x1, FLOdc x1, BLOsc x3, FLOdc x1, BLOsc x1, FLOdc x2, BLOsc x7, FLOdc x2, BLOsc x1, FLOdc x1, BLOsc x3, FLOdc x1, BLOsc x1, FLOdc x2, BLOsc x6*, repeat across, BLOsc x1, EBS in last.
Row 12: With Color A, BBS in 1st, *FLOdc x1, BLOsc x23, FLOdc x7, BLOsc x11, FLOdc x6*, repeat across, FLOdc x1, EBS in last.
Row 13: With Color B, BBS in 1st, *BLOsc x48*, repeat across, BLOsc x1, EBS in last.
Row 14: With Color A, BBS in 1st, *FLOdc x48*, repeat across, FLOdc x1, EBS in last.
Row 15: With Color B, BBS in 1st, *BLOsc x48*, repeat across, BLOsc x1, EBS in last.
Row 16: With Color A, BBS in 1st, *FLOdc x1, BLOsc x23, FLOdc x7, BLOsc x11, FLOdc x6*, repeat across, FLOdc x1, EBS in last.
Row 17: With Color B, BBS in 1st, *BLOsc x1, FLOdc x2, BLOsc x3, FLOdc x1, BLOsc x3, FLOdc x1, BLOsc x1, FLOdc x1, BLOsc x1, FLOdc x1, BLOsc x3, FLOdc x1, BLOsc x3, FLOdc x2, BLOsc x7, FLOdc x2, BLOsc x1, FLOdc x1, BLOsc x3, FLOdc x1, BLOsc x1, FLOdc x2, BLOsc x6*, repeat across, BLOsc x1, EBS in last.
Row 18: With Color A, BBS in 1st, *FLOdc x1, BLOsc x4, FLOdc x1, BLOsc x1, FLOdc x1, BLOsc x1, FLOdc x1, BLOsc x5, FLOdc x1, BLOsc x1, FLOdc x1, BLOsc x1, FLOdc x1, BLOsc x4, FLOdc x5, BLOsc x15, FLOdc x4*, repeat across, FLOdc x1, EBS in last.
Row 19: With Color B, BBS in 1st, *BLOsc x3, FLOdc x2, BLOsc x1, FLOdc x1, BLOsc x3, FLOdc x1, BLOsc x1, FLOdc x1, BLOsc x1, FLOdc x1, BLOsc x3, FLOdc x1, BLOsc x1, FLOdc x2, BLOsc x7, FLOdc x2, BLOsc x3, FLOdc x1, BLOsc x3, FLOdc x1, BLOsc x3, FLOdc x2, BLOsc x4*, repeat across, BLOsc x1, EBS in last.
Row 20: With Color A, BBS in 1st, *FLOdc x3, BLOsc x19, FLOdc x5, BLOsc x4, FLOdc x1, BLOsc x3, FLOdc x1, BLOsc x1, FLOdc x1, BLOsc x3, FLOdc x1, BLOsc x4, FLOdc x2*, repeat across, FLOdc x1, EBS in last.
Row 21: With Color B, BBS in 1st, *BLOsc x5, FLOdc x2, BLOsc x3, FLOdc x1, BLOsc x3, FLOdc x1, BLOsc x3, FLOdc x2, BLOsc x7, FLOdc x2, BLOsc x1, FLOdc x1, BLOsc x1, FLOdc x1, BLOsc x7, FLOdc x1, BLOsc x1, FLOdc x1, BLOsc x1, FLOdc x2, BLOsc x2*, repeat across, BLOsc x1, EBS in last.
Row 22: With Color A, BBS in 1st, *FLOdc x5, BLOsc x4, FLOdc x1, BLOsc x1, FLOdc x1, BLOsc x1, FLOdc x1, BLOsc x1, FLOdc x1, BLOsc x4, FLOdc x5, BLOsc x4, FLOdc x1, BLOsc x3, FLOdc x1, BLOsc x1, FLOdc x1, BLOsc x1, FLOdc x1, BLOsc x1, FLOdc x1, BLOsc x3, FLOdc x1, BLOsc x4*, repeat across, FLOdc x1, EBS in last.
Row 23: With Color B, BBS in 1st, *BLOsc x7, FLOdc x2, BLOsc x1, FLOdc x1, BLOsc x3, FLOdc x1, BLOsc x1, FLOdc x2, BLOsc x7, FLOdc x2, BLOsc x3, FLOdc x1, BLOsc x1, FLOdc x1, BLOsc x3, FLOdc x1, BLOsc x3, FLOdc x1, BLOsc x1, FLOdc x1, BLOsc x3, FLOdc x2*, repeat across, BLOsc x1, EBS in last.
Row 24: With Color A, BBS in 1st, *FLOdc x7, BLOsc x11, FLOdc x7, BLOsc x23*, repeat across, FLOdc x1, EBS in last.
Row 25: With Color B, BBS in 1st, *BLOsc x48*, repeat across, BLOsc x1, EBS in last.
Row 26: With Color A, BBS in 1st, *FLOdc x48*, repeat across, FLOdc x1, EBS in last.
Purchase the Totally Trapezoids Blanket Strip Pattern
You can buy the ad-free, PDF of this pattern in my Etsy shop, Ravelry store, and LoveCrafts.
More Mosaic Crochet Patterns You Will Love to Make
I love seeing your finished projects! If you enjoyed making the Mosaic in a Month Blanket with this pattern, I’d love to see yours on Instagram. To be sure I don’t miss it, please tag me @remingtonlanecrochet when you share your photos!

Copyright 2020-2024 Remington Lane Crochet, LLC. This pattern and its images are copyright protected and the sole property of Remington Lane Crochet LLC. Please do not redistribute, transfer, or sell the pattern, or alter it to claim as your own.
You may sell any products you create from this pattern. Please credit the designer by linking online listings to https://remingtonlane.com/ or by tagging @remingtonlanecrochet

Where is the chart?