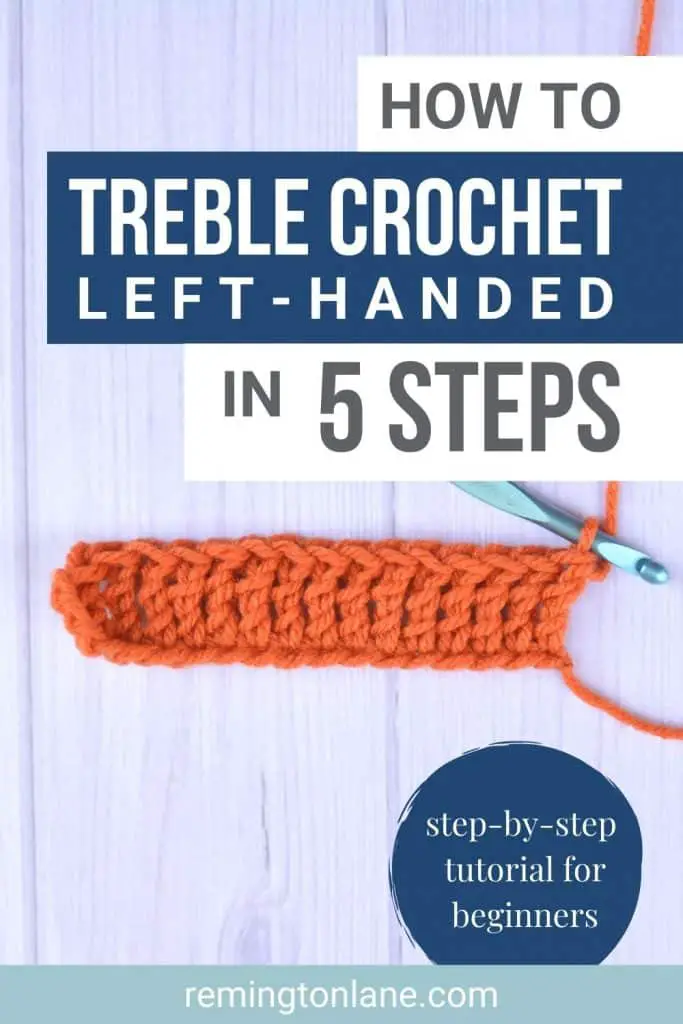
How to Make the Treble Crochet (TR) Stitch Left-Handed
As you grow your crochet skills, the treble crochet stitch is one of the beginner basic stitches that you must learn how to make. I know it is often hard to get the hang of a new skill, and I’ve put together some step-by-step photos so that you can make the treble crochet left-handed.
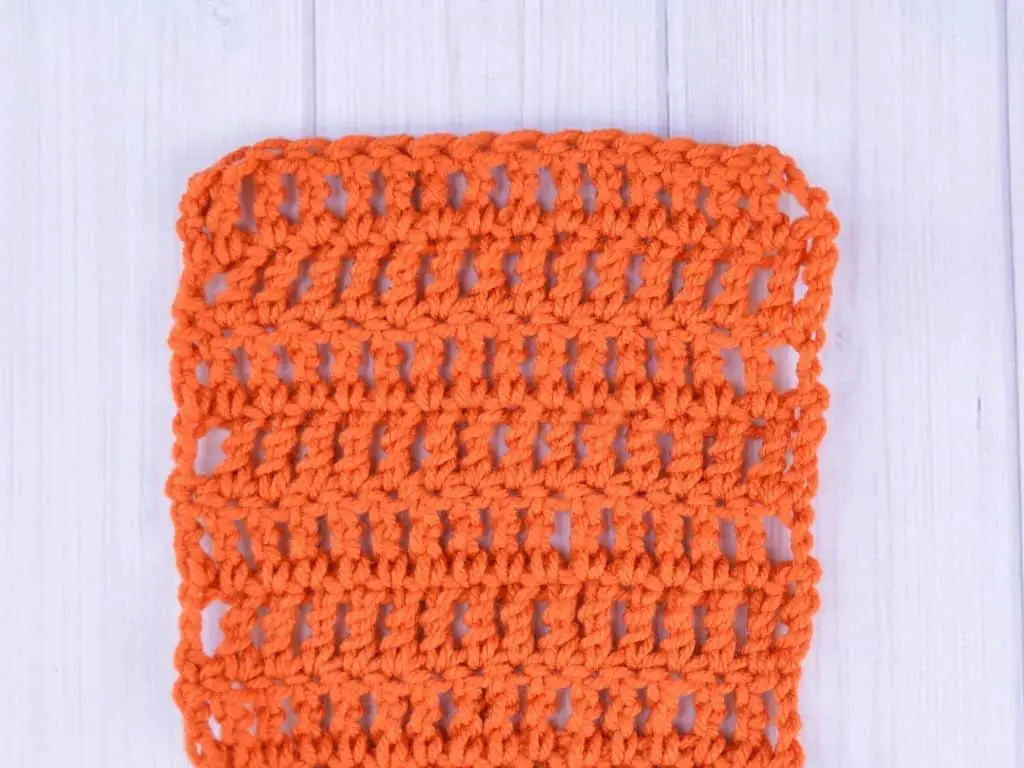
Treble crochet stitches are tall and can create some really beautiful projects, like scarves, garments, and other accessories.
Before we get started, you should know that if you are learning how to crochet, I suggest you check out my single crochet and double crochet stitch tutorials first. Not that you can’t jump ahead, but understanding how to make those two stitches will help you understand how treble crochet stitches are formed.
Let’s look at the written directions for the treble crochet stitch. Then I’ll break it down into smaller steps with photos to make it easier to see what’s going on.
Yarn over twice and insert your hook [into a chain or stitch], yarn over and pull up a loop, yarn over pull through two loops, yarn over pull through two loops, and yarn over and pull through two loops.
What is a Treble Crochet Stitch?
The treble crochet stitch is defined by the TR abbreviation in patterns.
You might be wondering why it’s called the treble crochet stitch. Treble means that something is threefold in size. So the treble is three times the size of the single crochet stitch. It’s three times as tall as the single crochet stitch, and you may have seen in the written directions that you “yarn over and pull through two loops” three times.
Note that the treble crochet stitch is called the double treble crochet stitch in UK terminology. See my guide on the US to UK term conversions so that you know which stitch your pattern uses.
How to Get Started with the Treble Crochet Stitch
Before you make any treble crochet stitches, gather the following materials together.
- Yarn, any kind as defined by your pattern. If you don’t have a pattern, I suggest some worsted weight yarn in an easy-to-see color.
- Crochet hook – size defined by your pattern or recommended by the yarn label
- Yarn needle and scissors
Tips for Successfully Making the Treble Crochet Stitch
The taller the stitch, the easier it is to have loose stitches. It’s also harder to maintain consistent tension with your yarn as you get into stitches that are more complicated in their steps.
That doesn’t mean you have to crochet extra tight when you make the treble crochet stitch, but your tension is something to be aware of. If you are a beginner, you might find your treble stitches start off loose and then gradually settle into a consistent size. This is normal, even for experienced crocheters.
Consistency in your stitches is something that comes with practice and time. Try to hold your hook the same way and be aware of how tightly you are gripping it as you go along. You can also pay attention to how you hold your arms.
If you get to the end of your treble crochet stitches and they’ve gone a bit wonky, the beauty of crochet is that you can pull out the stitches and start over.
Steps for Making the Treble Crochet Stitch
Now that you understand how the treble crochet stitch relates to other beginner crochet stitches and some tips for being successful, you’re ready to make it.
Make the Foundation for a Treble Crochet Stitch
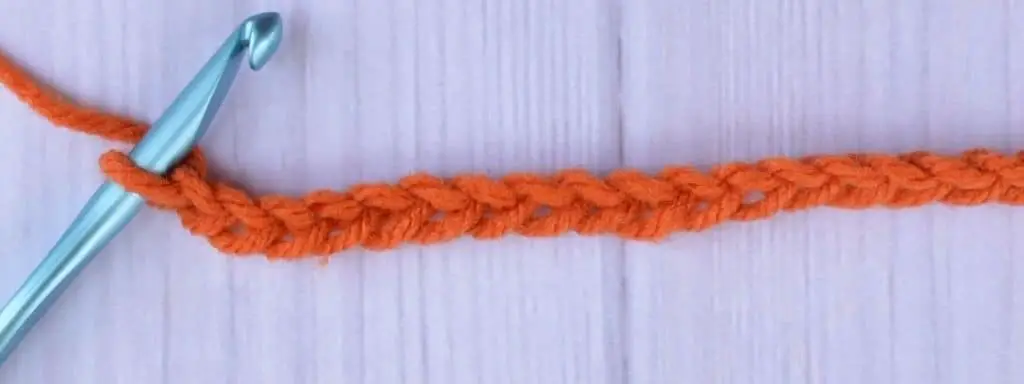
First, you need to make a slip knot and chain some stitches. Holding the hook in your left handed, chain about 20-25 stitches so that you can make a practice swatch.
Written Directions to Make a Treble Crochet Stitch
You’re ready to get started! Let’s look at the written directions again and break them into four steps:
Yarn over twice and insert your hook, yarn over and pull up a loop, yarn over pull through two loops, yarn over pull through two loops, and yarn over and pull through two loops.
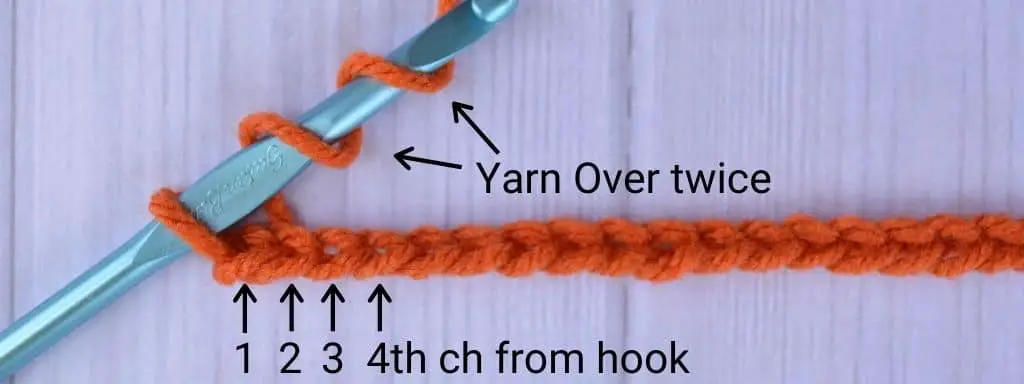
Step 1: Yarn Over Twice and Insert Your Hook
Hold the hook in your left hand and “yarn over twice”, meaning you want to wrap the yarn around your hook two times. Holding your project in your right hand, insert the hook into the fabric.
Your pattern will tell you where to insert your hook, but if you’re not following a pattern, insert your hook into the 4th chain from the hook.
Note: The loop on your hook does not count as a chain.
Step 2: Yarn Over and Pull Up a Loop
While your hook is sticking through to the back side of your piece, yarn over (wrap the yarn) and use your hook to pull the yarn to the front side of your project.
This is called “pulling up a loop” because you’ll see that there is now another loop on your hook.

Step 3: Yarn Over and Pull Through Two Loops
Wrap the yarn around your hook. Using your hook, pull the yarn through the two loops closest to the mouth of the hook. You will now have three loops left on your hook.
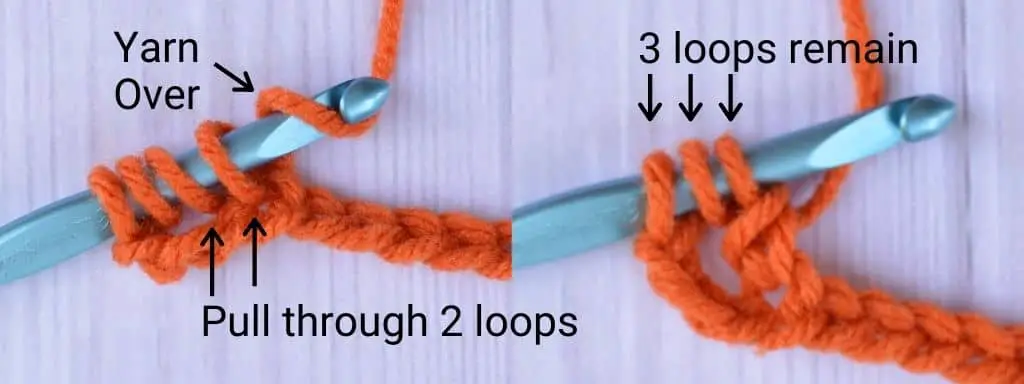
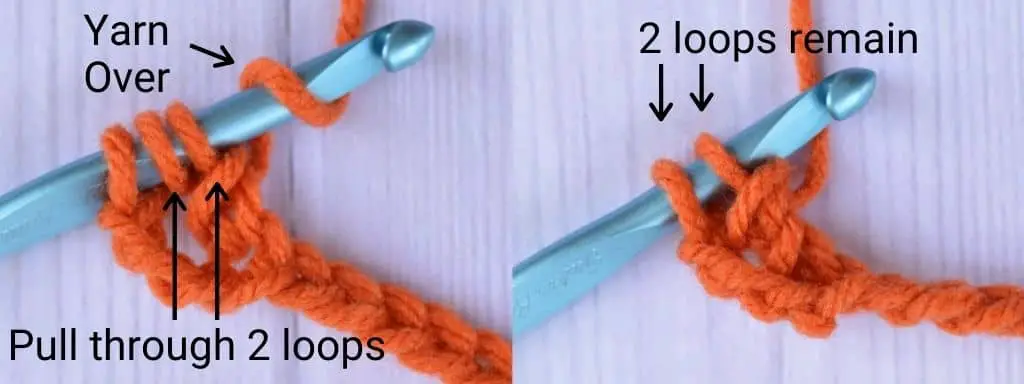
Step 4: Yarn Over and Pull Through Two Loops
Wrap the yarn around your hook again. Pull the yarn through the two loops closest to the mouth of the hook. You now have only two loops remaining on your hook.
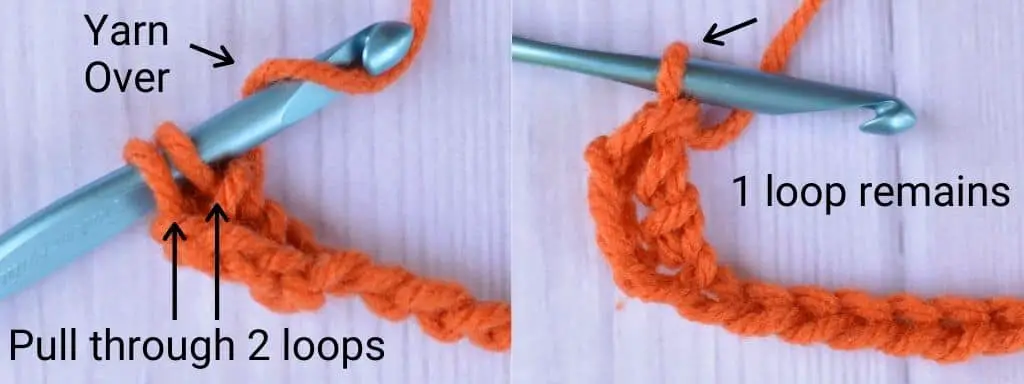
Step 5: Yarn Over and Pull Through Two Loops
For the last time, wrap the yarn around your hook and pull the yarn through the two loops on your hook. Only one loop remains on your hook.
You’ve just made one treble crochet stitch!
Now keep going! Repeat steps 1-5 for each chain in the foundation. Soon you’ll have one row of treble crochet stitches.

Common Questions About the Treble Crochet Stitch
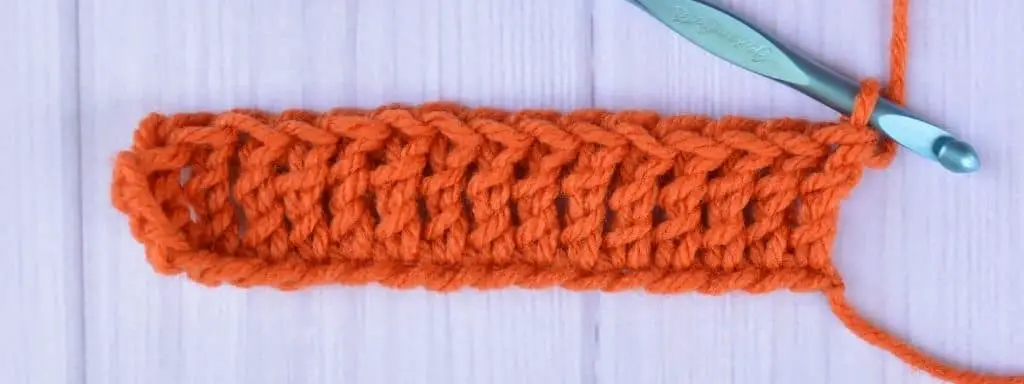
What Does the First Row of Treble Crochet Stitches Look Like?
When you finish the first row of treble crochet stitches, it will start to take shape. The ends might not look a squared off yet, but that’s nothing to worry about.
You can also see how tall the treble crochet stitches are compared to other stitches you’re familiar with.
How Do You Transition to the Second Row of Treble Crochet Stitches?
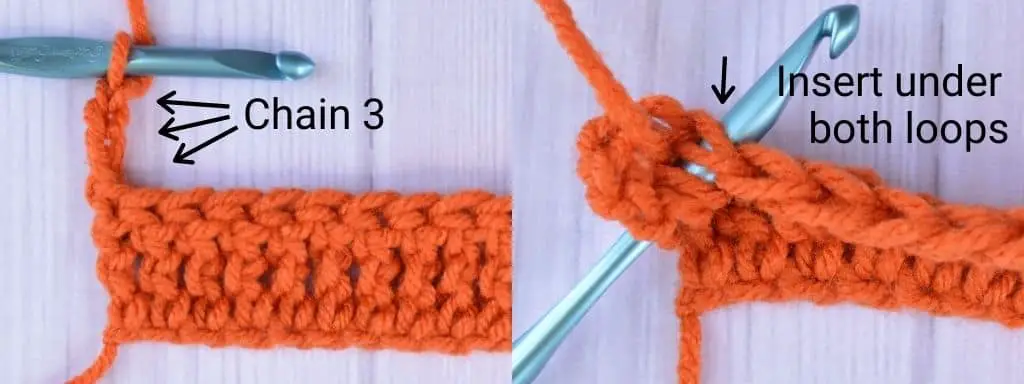
To get to the next row of treble crochet stitches, start by turning your work and making what is called “turning chains”. To turn your work, flip your piece from the front to the back.
In patterns, you will see the turning chains at either the beginning or the end of a row. At the end of a row, the instructions would read “… Ch 3 and Turn.” Alternatively, you may see the end of a row tell you to turn, and the beginning of the next row tells you how many chains to make.
The order typically doesn’t matter, and most crocheters get into their own preferences over time, but I suggest following the order listed in your pattern.
Your pattern will also define the number of turning chains to transition to the next row of treble crochet stitches. but for this practice swatch, chain 3 times.
How Do You Finish Off a Row of the Treble Crochet Stitch?
After you have completely finished your practice rows of treble crochet stitches, you need to secure your yarn so that it doesn’t come unraveled.
This is often called “fastening off”, “finishing off” or “tying off” the ends.
To do this, you need to cut your yarn away from the skein, leaving about a 6-inch tail. You need several inches so that you have enough to weave into the fabric.
To weave in your ends, thread your yarn into your yarn needle and weave the yarn into your fabric. Try to weave it in where it will be hidden, which means following the stitches that exist.
After you weave your yarn into several stitches, pull it tight slightly, and trim it very close to the fabric with your scissors. Then stretch out your piece a little bit so that your tail is completely hidden.
Sit back and admire your piece, because you’re done!
What Are the Variations That Can Be Done With the Treble Crochet Stitch?
Now that you know how to make the treble crochet stitch, you can use the steps above to create several variations.
Don’t be afraid. The difference in these variations comes when you talk about where to insert your hook (step 1). The rest of the steps are identical.
Treble Crochet Into the Front Loop Only
When you see instructions to make stitches FLO, that means you are inserting your hook into the Front Loop Only instead of under both of the loops. No matter which side of the work you are on, the front loop is the loop that is closest to you at that time.
Treble Crochet Into the Back Loop Only
Back Loop Only, often written as BLO, is the opposite of the front loop only crochet. When you are looking at your project, insert your look under the top loop that is farthest from you. And when you turn your work, you will work in the loop farthest from you.
Front Post Treble Crochet
Instead of changing up which loop you insert your hook into, another great way to create texture is by crocheting around the post of the stitch. The front post treble crochet is abbreviated FPtr. It creates a unique ribbing texture by pushing the top loops of the row below onto the back of your work.
Back Post Treble Crochet
Next, you can try the back post treble crochet, written as BPtr. If shouldn’t come to you as a surprise that it’s the opposite of the front post treble crochet stitch. The back post treble crochet stitch creates a ribbed look by bringing forward the top loops of the row below.
Treble Crochet Increases
When you get further along in your crochet skills, you will be able to follow patterns that use treble crochet increase and decrease stitches. Increasing stitches are created when you make more than one treble crochet stitch in the same location.
As an example, you will see ” 5tr in the next stitch,” meaning you will put five treble crochets into the next stitch. You complete the entire treble crochet stitch and to make the next stitch, insert your hook into the same place as your existing stitch. Increasing stitches are commonly used in shell stitches, chevrons, and ripple patterns.
Treble Crochet Decreases
Decreasing stitches are written in a way that tells you exactly how many stitches to combine. For example, the abbreviation for decreasing two treble crochet stitches together is show as tr2tog. Not so scary right?
To create decreasing stitches, complete your treble crochet to step 4 above (two loops remain on the hook), then insert your hook into the next stitch. When you get to step 4 above, you’ll have three loops on your hook. Then, in step five, finish off your decreasing stitch by pulling through all of the loops on your hook.
The Last Thing You Need to Know About the Treble Crochet Stitch
Treble crochet stitches build upon your knowledge of other beginner crochet stitches like single and double crochet. The difference is how many times you wrap the yarn around the hook at the beginning. Additionally, you “pull through two loops” until only one loop remains on your hook.
If you try any of the advanced beginner stitches like back loop or front post stitches, remember that the location of where to put your hook is always relative to the side of the work facing you.
Want more practice with the treble crochet stitch? Check out these fun crochet projects
- Chunky Cozy Scarf
- Gentle Embrace Infinity Scarf
- Gentle Embrace Preemie Blanket
- Bobble Bouquet Blanket Strip
I’d love to see what you make with the treble crochet stitch! Connect with me on Facebook and Instagram and show me your work. To learn more crochet stitches, be sure to visit the stitch tutorial library.


Leave a Reply