How to Make the Double Crochet (DC) Stitch Right-Handed
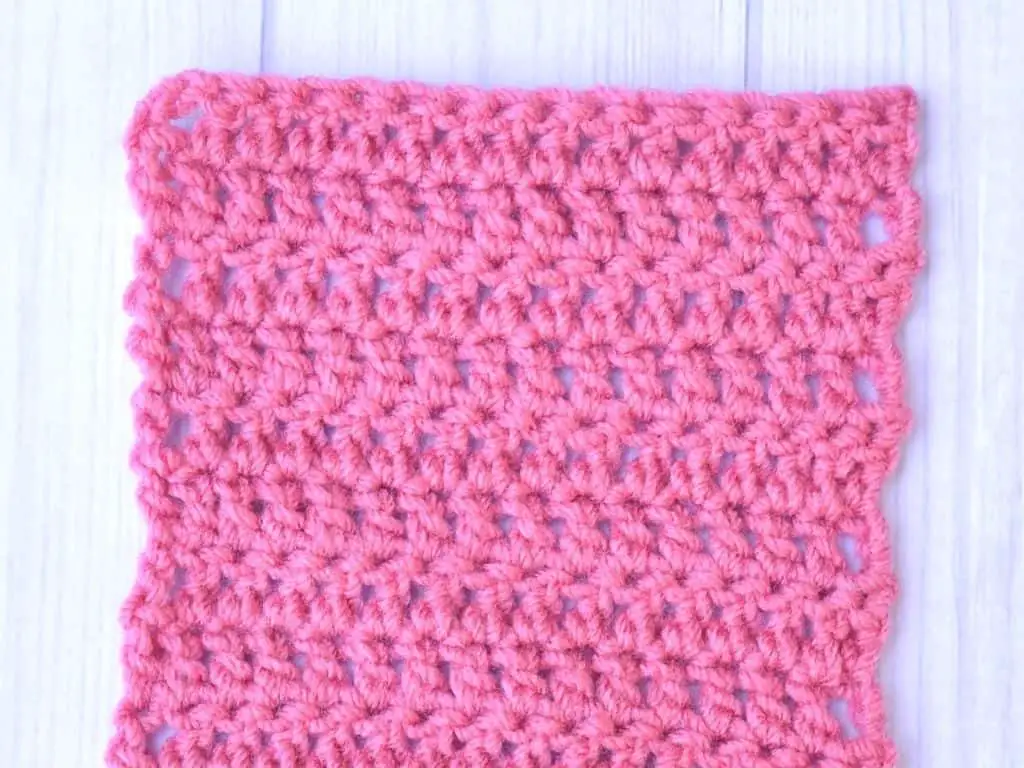
The double crochet stitch is one of the beginner basic stitches that every right-handed crocheter needs to master. It is so versatile that the double crochet stitch, or variations of it, can be found in virtually every kind of crochet item.
You can use the double crochet stitch to make prayer shawls and blankets because it works up quickly. There is such beauty in the way the yarn twists for each stitch while providing just the right kind of density and drape to the fabric.
Let’s look at the written instructions and then break it down into manageable steps.
Yarn over and insert the hook, yarn over and pull up a loop, yarn over and pull through two loops, yarn over and pull through two loops again.
By the end of this tutorial, I hope you feel confident enough to tackle any pattern with a double crochet stitch. If you’re ready, let’s dive in.
What is a Double Crochet Stitch?
The double crochet stitch is abbreviated as DC in patterns.
We also need to discuss the stitch height. In case it is not obvious enough, the double crochet stitch is twice as tall as a row of single crochet stitches.
When you make the double crochet stitch, you will find that some of the steps are very similar to steps in other beginner crochet stitches. The difference is in the number of times you wrap the yarn around the hook and how many loops you pull through as you finish the stitch.
Note that the double crochet stitch is called the treble crochet stitch in UK terminology. See my guide on the US to UK term conversions so that you know which stitch your pattern uses.
How to Get Started with the Double Crochet Stitch
Before you can make any double crochet stitches, you need some materials.
- Yarn, any kind (or as defined by your pattern)
- Crochet hook (defined by your pattern or reference the yarn label for a recommended hook size)
- Yarn needle and scissors
Are you left-handed? Follow along with my left-handed tutorial instead.
Tips for Successfully Making the Double Crochet Right-Handed
The double crochet stitch is widely used, so it is important that you practice before you get started with your project.
To ensure you don’t end up with loose stitches, make sure that you keep the yarn snug when you wrap it around your hook in step one below. You don’t have to wrap it tightly, but you want it to be comfortably snug. This is one of those things that you will get used to with time and practice.
Also, if you find yourself crocheting too loose, change to a smaller hook and it will tighten up your stitches. If you are crocheting to tight, switch to a larger hook to loosen up your stitches.
Steps for Making the Double Crochet Stitch
Make the Foundation for a Double Crochet Stitch
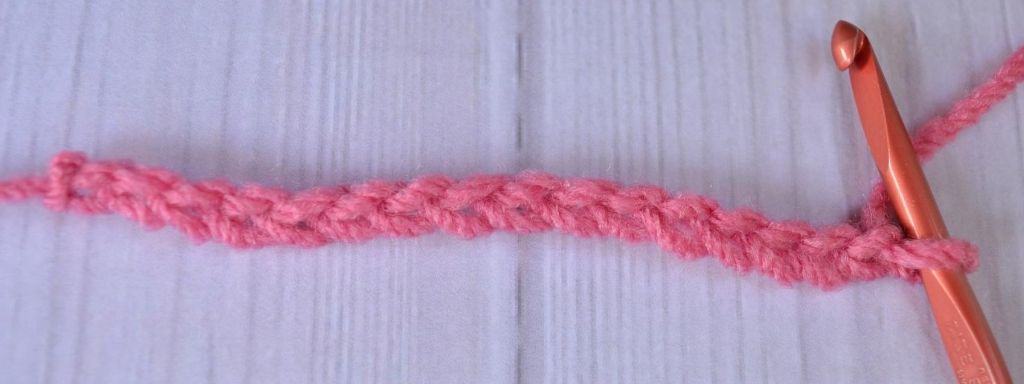
To make your swatch of double crochet stitches, I recommend that you make a slip knot and then add anywhere from 20-30 chain stitches. That allows you to create a practice swatch that is large enough to hold onto and practice several stitches in each row.
Written Directions to Make a Double Crochet
You’re ready to get started! Let’s look at the written directions again and break them into four steps:
Yarn over and insert the hook, yarn over and pull up a loop, yarn over and pull through two loops, yarn over and pull through two loops again.
Step 1: Yarn Over and Insert Your Hook
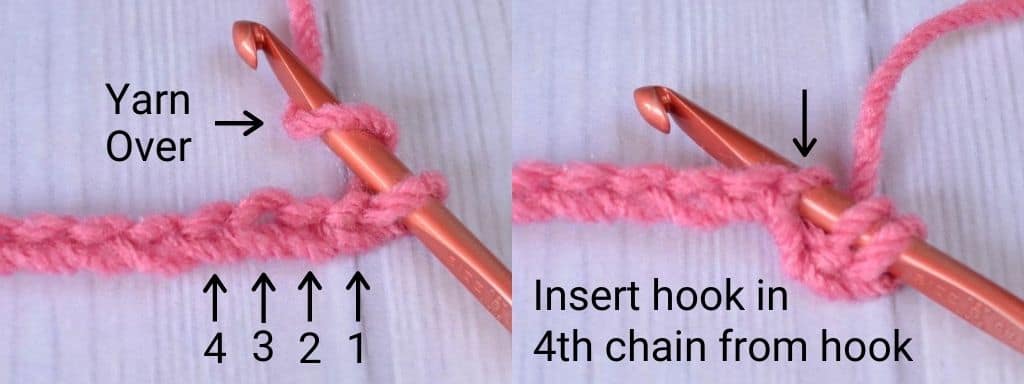
Yarn over means you should wrap the yarn around your hook. For the double crochet, you will yarn over one time prior to inserting your hook into the fabric. I wrap my yarn the direction coming from the back to the front.
For this tutorial, yarn over and insert your hook into the 4th chain from your hook. Your hook will be sticking through to the back of the fabric.
Note that after you’ve made the first row of double crochet stitches, you will insert your hook into the top of the stitch from the row below. I’ll show you how to do that in just a little bit.
Step 2: Yarn Over and Pull Up a Loop
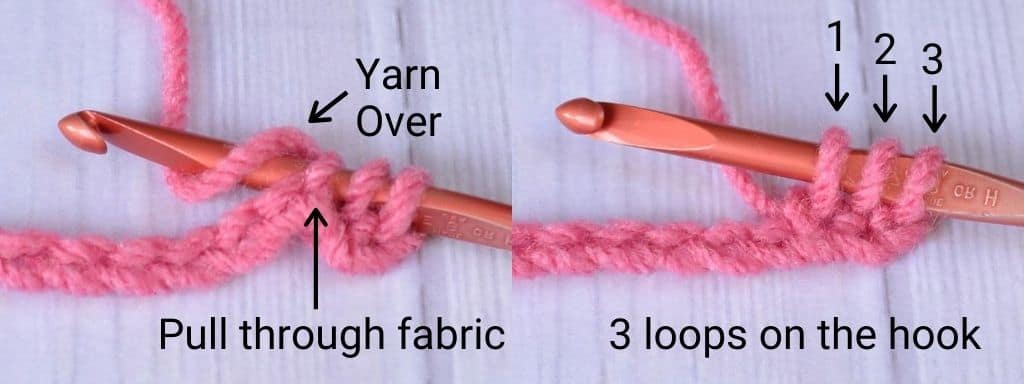
Next, while the hook is still sticking through to the back of the fabric, yarn over again and use the mouth of the hook to grab the yarn and pull it back through to the front side of the fabric. You will have three loops on your hook.
Here you should only pull your hook through the fabric. Do not pull it through any loops on your hook yet.
Step 3: Yarn Over and Pull Through Two Loops
Wrap the yarn around your hook and pull through the first two loops on your hook. You will have two loops remaining on your hook.
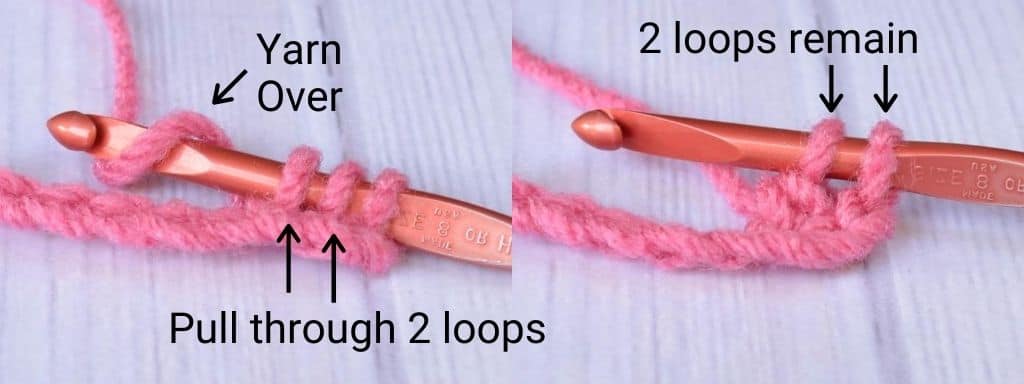
Step 4: Yarn Over and Pull Through Two Loops (Again)
To finish your double crochet stitch, yarn over one more time and pull it through the remaining two loops on your hook. Congrats! You’ve completed your first double crochet stitch!
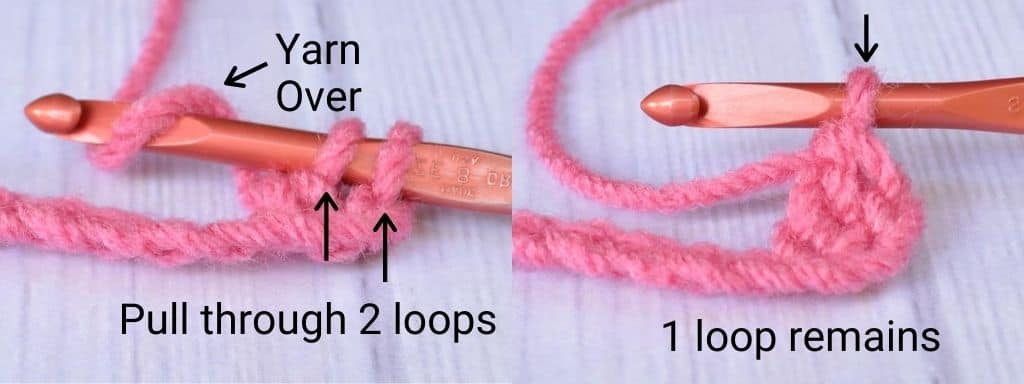
Repeat steps 1-4 to continue making double crochet stitches in each chain until you reach the end of the row. Next I’ll show you how to transition to the next row.

Common Questions About the Double Crochet Stitch
What Does the First Row of Double Crochet Stitches Look Like?
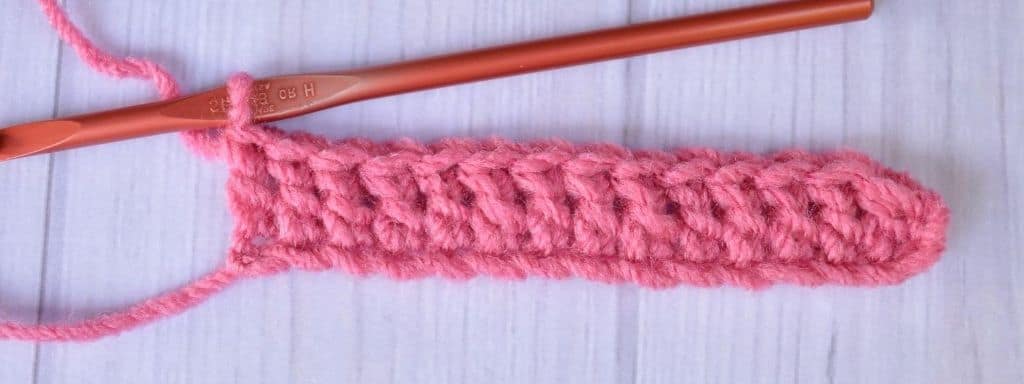
When you finish your first row of double crochets, your work will start to take shape and you will see that your foundation chain disappears into the fabric.
If you are following a pattern, stop here and count the number of stitches in your row and ensure it matches your pattern. Depending on the pattern, you will need to count the chains from the beginning of row one as a stitch. Check your pattern notes to see if it mentions whether the chain counts as a double crochet.
How Do You Transition to the Second Row of Double Crochet Stitches?
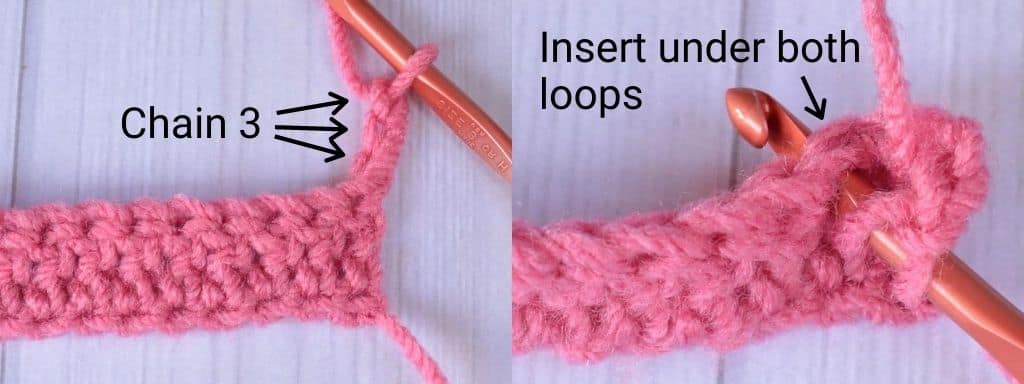
To transition to a new row of double crochet stitches, you need to make a few chains, called “turning chains”, equal to the height of your double crochet stitches. Then you can turn your work.
Alternatively, you can turn your work first and then make the turning chains. The order you chain and turn usually doesn’t matter, but I recommend following the order it is written in your pattern.
Most patterns will write this as “… Ch 3. Turn” or you will see the end of one row has the word “turn” and the stare of the next row begins with “Ch 3”.
Next, you are ready to start the second row of double crochet stitches. The first double crochet you make in this row will go underneath the two loops of the second stitch from the first row. Follow steps 1-4 above to make row two of your double crochet swatch.
How Do You Finish Off a Project Made of Double Crochet Stitches?
Crochet several rows of your double crochet swatch before finishing off your work. Finishing off or “fastening off” means that you are cutting the yarn and weaving in the ends to give your piece a finished look.
To begin, cut the yarn about 6 inches away from your work. This will give you a long enough yarn tail to weave into your fabric.
Wrap your yarn around the hook one more time, as if you are making a chain stitch. Instead of making a chain, use your hook to keep pulling the tail all the way through the loop on the hook.
Then, remove your hook and use your hands to pull the tail tight to your work.
Next, take your yarn needle and weave the yarn into your fabric. Make sure you weave the yarn in and around several stitches so that it blends seamlessly. Additionally, weave in enough of the tail so that it is secure and won’t come out. Then cut the yarn close to the fabric.
What Are the Variations That Can Be Done With the Double Crochet Stitch
Once you have mastered the double crochet stitch, I want to encourage you to try some variations on this stitch. To make them, you follow the same steps listed above, but you insert your hook differently, beginning in row two.
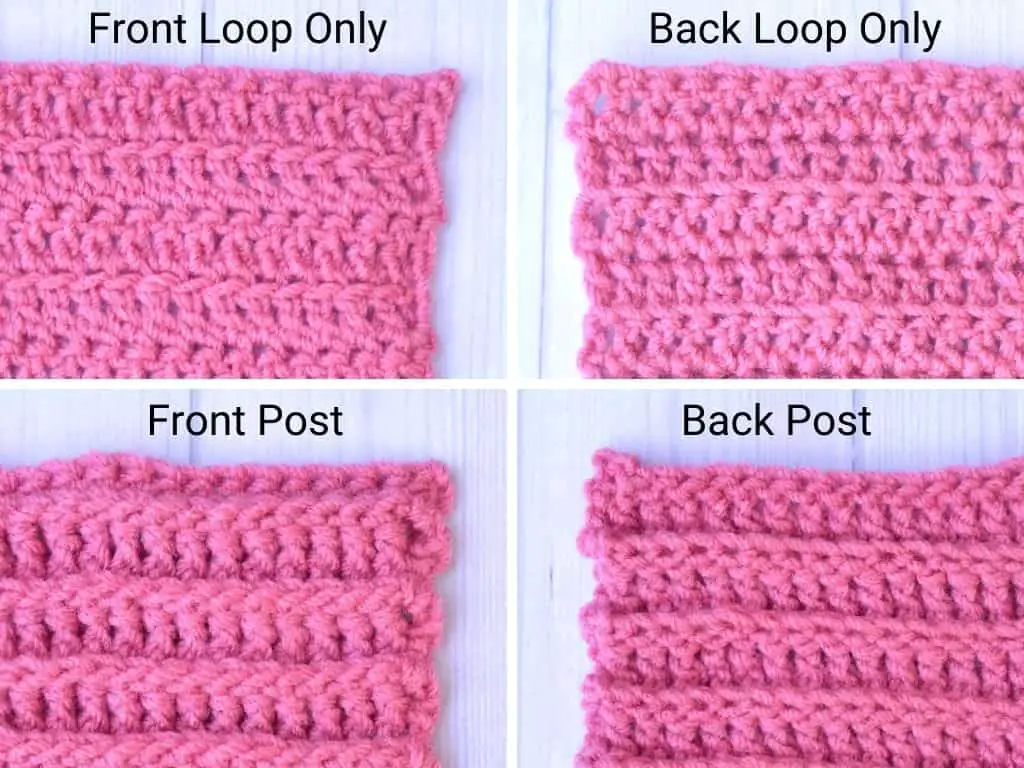
Double Crochet in the Front Loops or Back Loop
You can achieve a ridge-like texture when you double crochet into the front or back loop only, abbreviated FLO and BLO in patterns. Above, you inserted your hook under both loops of the stitch below, but with FLO and BLO, you insert your hook under just one of the loops.
The front loop is the loop closest to you and on the front of the work. Even though you are turning your work, you always use the loop closest to you.
The back loop is simply the opposite. It’s the loop on the back side of the work.
Double Crochet around the Front Post or Back Post
Another variation to the double crochet stitch is to insert your hook around the front or back posts. These are written as FPdc and BPdc in patterns and are used to create ribbing and basketweave textures. The combinations are endless and patterns will use one or the other or both.
Double Crochet Increases
Increasing stitches are used quite often to create ripple and chevron patterns. To create a double crochet increase, make multiple double crochet stitches into the same spot.
You might see this written as “2 dc in next st”, which means you will make two double crochet stitches in the next stitch. After you make the first double crochet, repeat steps 1-4, inserting the hook into the same spot where you put the first double crochet.
Double Crochet Decreases
Additionally, you may find a pattern that uses increasing double crochets, also has decreasing stitches. These are harder to master than increasing simply because you create most of the first stitch (but not all) and then you create the next stitch.
Decrease stitches are written like “dc2tog”. Say it out loud and it will make more sense. Double crochet two together. Does that help?
To create those stitches, follow the steps above, do steps 1-3 and then go back to step 1, inserting your hook into the next stitch. Continue with steps 2-3. For step 4, you will pull through all of the loops on your hook.
The Last Thing You Need to Know About the Double Crochet Stitch
I hope you have enjoyed making the double crochet stitch. Keep practicing, and when you are ready, try making swatches that include some of the variations listed above.
Comment below and tell me how your double crochets are coming along!
Want more practice with the double crochet stitch? Check out these fun crochet projects:
- Lisa Blanket, an easy weekend baby blanket
- Grit Stitch Washcloth – a 10-inch square of beautiful texture
- Rustic Christmas Tree Skirt – beginner-friendly and customizable
- Ocean Waves Ripple Prayer Shawl – texture and coziness in one
I’d love to see what you make with the double crochet stitch! Connect with me on Facebook and Instagram and show me your work. To learn more crochet stitches, be sure to visit the stitch tutorial library.


Leave a Reply