How to Make the Crochet Puff Stitch Left-Handed
I’m so excited that you want to learn how to crochet the puff stitch! It’s one of my favorite stitches to incorporate texture, and you’ve probably seen it in many different types of projects you’ve got saved to your Pinterest boards.
I know what it’s like to be left-handed and trying to interpret a right-handed tutorial. Everything is backward and it’s confusing to do the opposite, especially when you’re learning something new.
So, I’ve created this in-depth left-handed tutorial with lots of photos so that you can learn all about the puff stitch.
Not only are there step-by-step photos below, but I’ve included some tips, tricks and answered some common questions you will have once you conquer making the actual stitch.
This post may contain affiliate links. If you use these links to buy something, I may earn a small commission. Affiliate links help me continue to provide free content at no extra cost to you.
What is a Crochet Puff Stitch?
Before we get into the steps, I want to give you some background on the puff stitch.
The puff stitch is used mainly for adding texture and visual interest to a project. Pieces can incorporate a single puff stitch here and there, or group them together for a more pronounced look.
Most often, I see them used in hats, and you may see them in the yoke of a sweater or other cozy projects. The puff stitch can also be used for functional purposes in housewares like face scrubbies or washcloths because it has a smooth feeling to each individual stitch but can be great at exfoliating when grouped together.
Another thing to know is that the puff stitch is not to be confused with a cluster, bobble, or popcorn stitch. Those are made by making several individual stitches together within the same spot on your project, whereas the puff stitch is one single stitch all by itself. You could group them together to make a cluster of puff stitches, but I don’t want to get too complex right now.
How to Get Started with the Left-Handed Puff Stitch
If you’re ready to get started with the puff stitch, grab some yarn and a crochet hook that matches the size of the yarn.
If you just want to practice on a test swatch, I suggest a worsted or bulky weight yarn so that you can really see what you’re working with.
Additionally, go ahead and make a few rows of half double crochet or single crochet stitches so that you have something to hold onto before you start the puffs.
Tips for Successfully Making the Puff Stitch
I also want to share some things that I find helpful when making puff stitches. I’m going to tell them to you now so that you know what to watch for.
- Try to keep your tension loose enough so that you can hold your hook parallel to your project when you have all the loops on your hook.
- Keep the loops on your hook in order, next to each other. Sometimes they get crossed over each other and it will make your puff stitch look funny. When this happens, rip it out and start over.
- Puff stitches often lean to one side, so don’t be alarmed if they’re slightly angled. As a lefty, mine lean to the right.
- When you finish the puff stitch it looks like you need to do something more to “close” it. You don’t, but some patterns will often follow a puff stitch with a chain 1. I’ll show you what that looks like down below, but my tip is to be sure to follow what the pattern states.
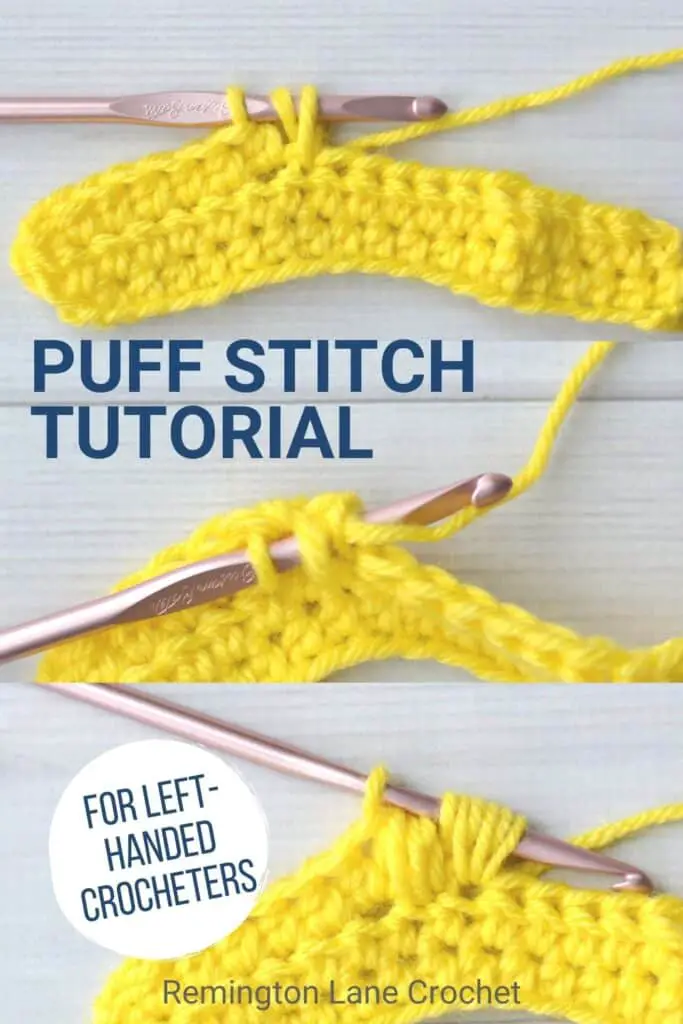
Steps for Making the Crochet Puff Stitch Left-Handed
The most popular puff stitch is made using the following directions:
Puff Stitch: * Yarn over, insert your hook, yarn over and pull up a loop *, repeat from * to * two more times (7 loops will be on your hook), yarn over and pull through all the loops
Let’s break it down into manageable steps.
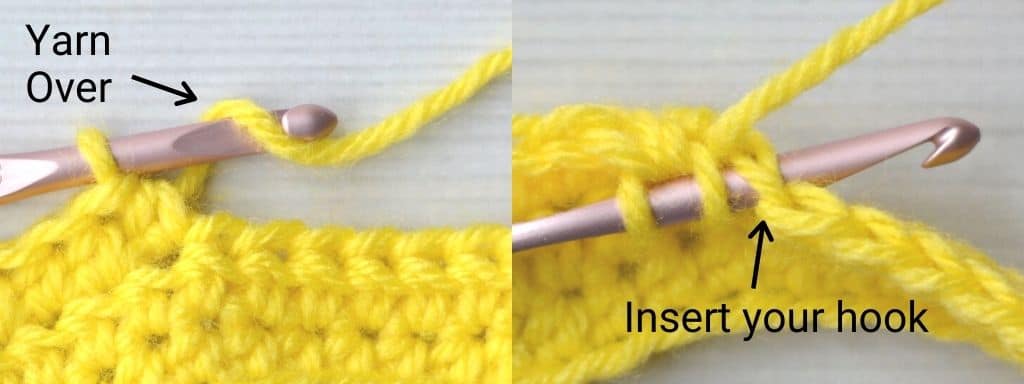
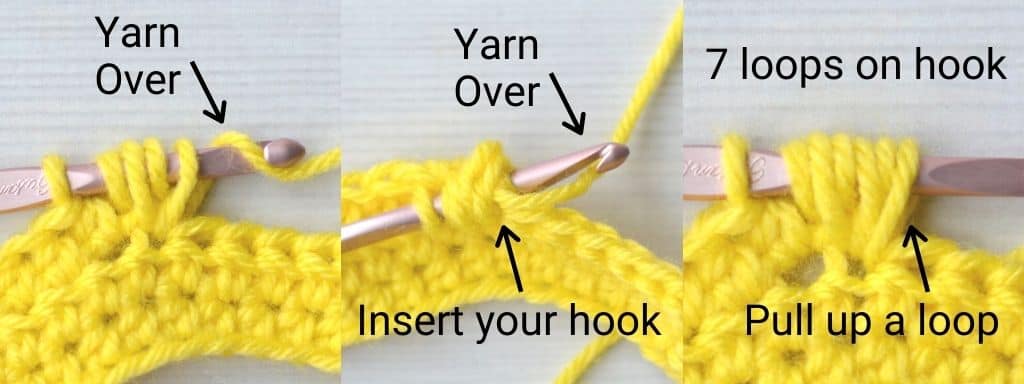
Step 1: Yarn Over, Insert Your Hook
Just like the start to a half double crochet stitch, wrap the yarn around your hook and Insert your hook into the next stitch.
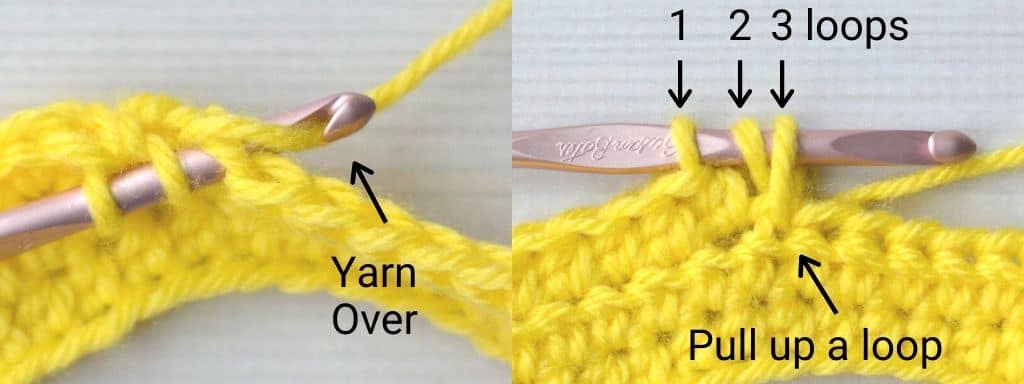
Step 2: Yarn Over and Pull Up a Loop
While your hook is poking through to the backside, yarn over again and then pull that yarn through to the front side of your piece. You will have three loops on your hook.
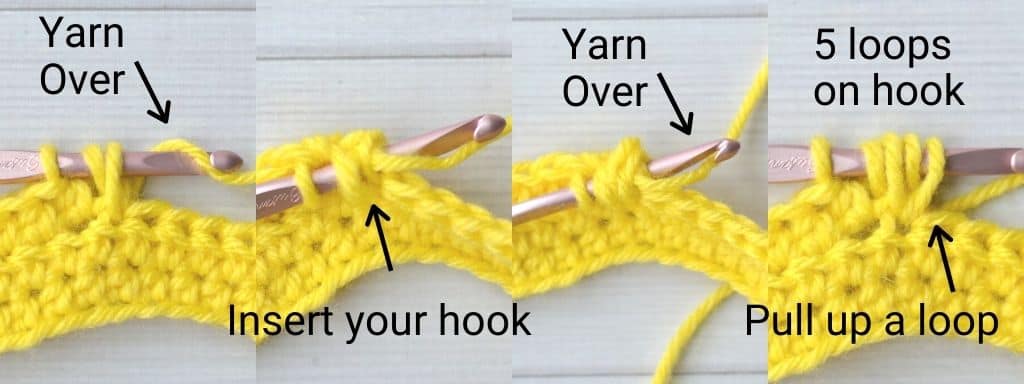
Step 3: Repeat Steps 1 and 2 (5 Loops On Your Hook)
Yarn over again and insert your hook into the same spot as you did in step one. While your hook is on the backside, yarn over again and pull up another loop. Now, you will have five loops on your hook.
Try to pull up this new loop so that it is equal height to the rest of the loops on your hook.
Step 4: Repeat Steps 1 and 2 (7 Loops On Your Hook)
In this final part, you repeat the beginning steps again. Yarn over and insert your hook into the same spot, while your hook is poking through your project, yarn over again and pull up one more loop.
Just as before, try to pull up this new loop so that it is equal height to the rest of the loops on your hook.
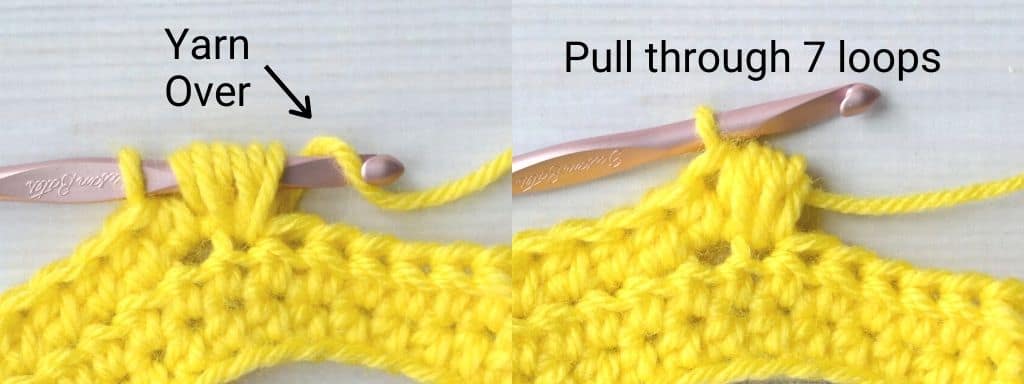
Step 5: Yarn Over and Pull Through All the Loops
The last step finishes off the puff stitch. Yarn over one more time, and pull the yarn through all seven loops on your hook. You have completed one puff stitch. Yay!

Common Questions About the Puff Stitch
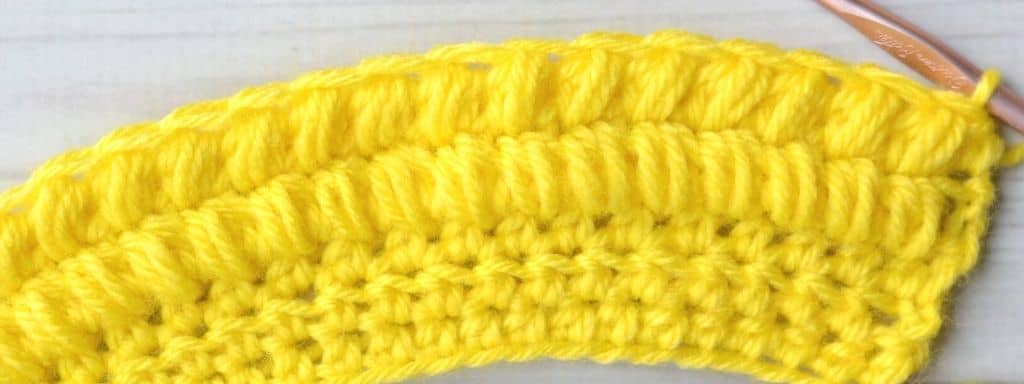
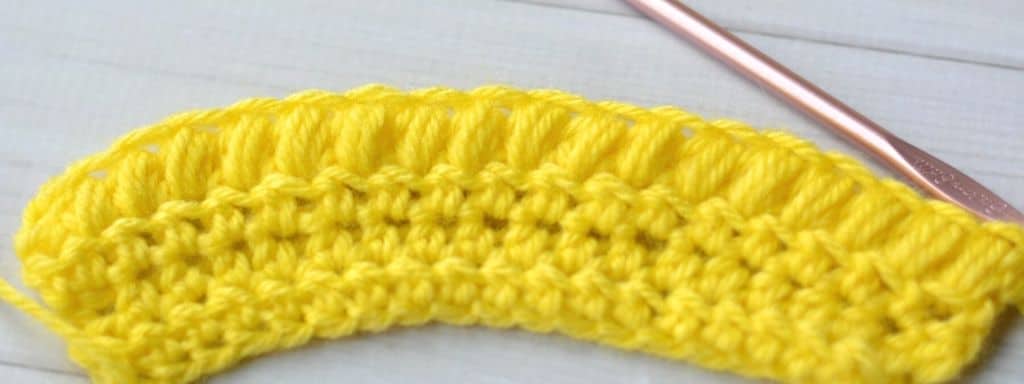
What Does a Row of Puff Stitches Look Like?
Many times your pattern calls for multiple puff stitches in a row or an entire row of puff stitches. Notice that because the stitches are bigger than traditional stitches, my swatch is starting to look like a rainbow.
My puff stitches tend to lean to the right. If you are following a pattern where the puff stitches are leaning the other way, don’t be alarmed. They were probably made by a right-handed crocheter.
How Do You Crochet the Second Row of Puff Stitches?
When making the second row of puff stitches, you shouldn’t really notice anything different when trying to place your stitches.
However, since puff stitches often lean, the second row will lean in the opposite direction as seen below in my swatch.
What Are the Variations That Can Be Done With the Puff Stitch?
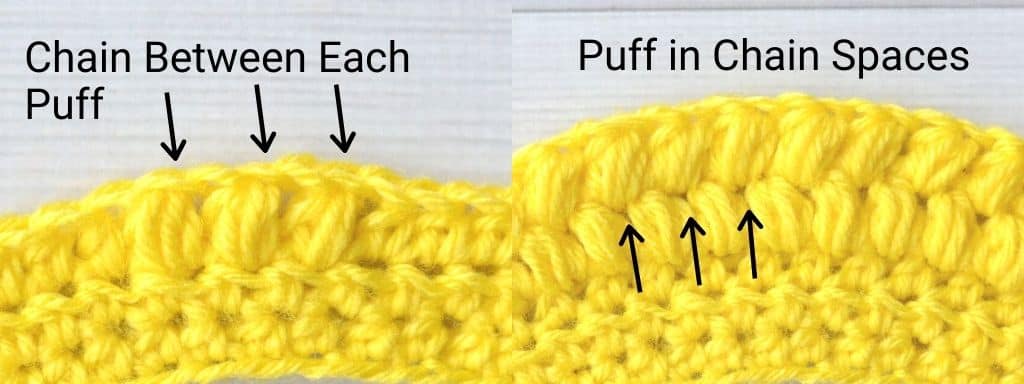
It depends on the pattern, you might see puff stitches followed by a chain 1 after each. Some call this “closing” the puff stitch because if you look back in step 5 above, the end of the puff stitch looks a little wonky and incomplete from what you might be used to with regular stitches.
Usually, when the puff stitches are followed by a chain one, it’s because you will be doing the second row of stitches within the chain space. In the swatch image below, I did all of the puff stitches in the chain space and you can see it has a slightly different look where there’s a little more room around the puff stitches in general.
The Last Thing You Need to Know About the Puff Stitch
Puff stitches are a great stitch to learn after you master the beginner stitches. They’re a great way to add texture to a project and can be made in groups or used for entire rows.
Remember to keep your hook parallel to your work so that each of the loops you pull up will be the same height. Sometimes the last one tends to be a little tighter than the rest, so just watch your tension. And be sure to have fun with puff stitches!
Want more practice with the puff stitch? Check out these fun crochet projects
I’d love to see what you make with the puff stitch! Connect with me on Facebook and Instagram and show me your work. To learn more crochet stitches, be sure to visit the stitch tutorial library.


Leave a Reply