How to Make the Crochet Bobble (B) Stitch for Left-Handed Crocheters
When I started venturing out beyond the foundational crochet stitches, I saw so many patterns that had these cool bumps on them. Bumps were being used in a variety of ways, such as spelling words, making shapes, and adding a really fun-looking texture.
Turns out, the bumps are called bobbles, and they’re easy to master if you can confidently make a double crochet stitch. And, as I found more crochet patterns that used the bobble stitch, I noticed that they can be made in a few different ways.
This tutorial is going to focus on 3 different ways to make the crochet bobble stitch. Let’s get started!
Right-handed? Follow the right-handed tutorial.
What is a Crochet Bobble Stitch?
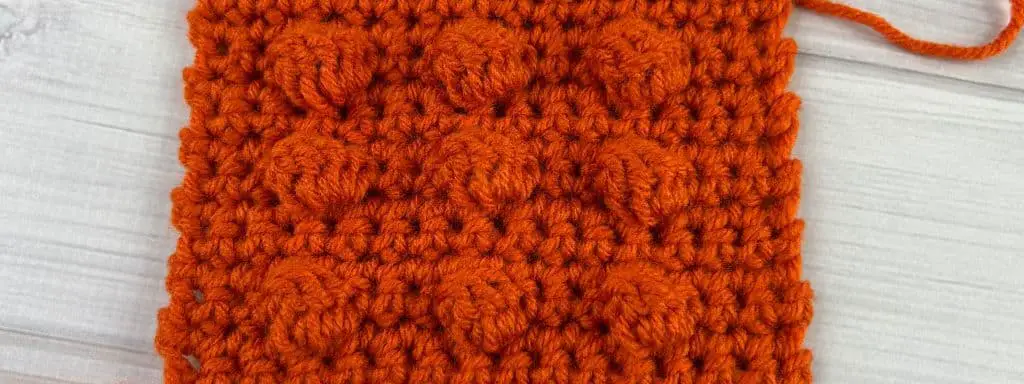
Before you can make the bobble stitch it’s good to know what the finished stitch will look like. The bobble stitch is kind of like a cluster of half-finished double crochet stitches that are stitched into the same spot. Once you have the desired number of partially-complete double crochet stitches created, you then do one final yarn over and pull through all the loops on your hook.
Additionally, it’s important to know that the bobbles are created while you’re working on the wrong side of the fabric. So the bump will be sticking out on right side of the fabric, so you won’t see it until you turn your work.
Lastly, bobbles are typically made with double crochet stitches. However, the stitches on either side of the bobbles are shorter stitches like single crochets. This allows for the bobble to really pop because the taller double crochets of the bobble will get scrunched a bit with the shorter stitches on either side. It will make sense once we get into it.
How to Get Started with the Bobble Stitch
If you’re ready to get started making the crochet bobble stitch, grab some yarn and a hook that goes with it. If this is your first time, I recommend using at least a size 4 worsted weight yarn or higher. It will be easier to see what you’re doing that way.
For a practice swatch, go ahead and crochet a few rows of single crochet stitches. If you’re already working on a pattern, follow the instructions until it’s time to make the bobble. My sample swatch had about 15 stitches in each row.
Tips for Successfully Making the Bobble Stitch
In order to successfully crochet the bobble stitch, here are some things to keep in mind:
- Make sure you’re working on the wrong side of the fabric
- Be confident in your understanding of how to make a double crochet stitch, since you will need to make several partially-complete double crochet stitches in each bobble
- When you finished the bobble stitch, you will need to turn your work in order to see it
- You can make bobbles with a variety of the number of double crochet stitches in them, so be sure to read which version your pattern calls for or experiment with different versions to see which you prefer
Steps for Making the Bobble Stitch
This bobble stitch tutorial uses 3, 4, and 5 double crochet stitches. In crochet patterns, bobbles are often abbreviated as the letter “B” or you may find them in pattern charts. Here are the written directions for each:
3 double crochet Bobble stitch: * Yarn over, insert your hook, yarn over and pull up a loop, yarn over and pull through two loops * repeat from * to * two more times (4 loops will be on your hook), yarn over and pull through all the loops
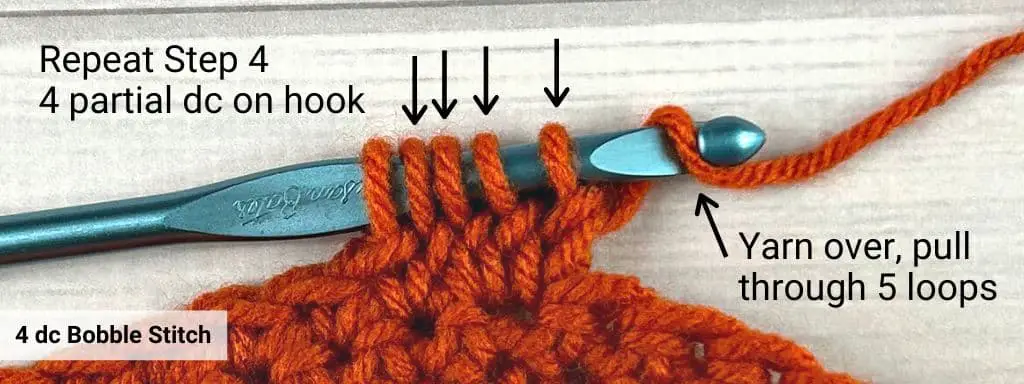
4 double crochet Bobble stitch: * Yarn over, insert your hook, yarn over and pull up a loop, yarn over and pull through two loops * repeat from * to * three more times (5 loops will be on your hook), yarn over and pull through all the loops
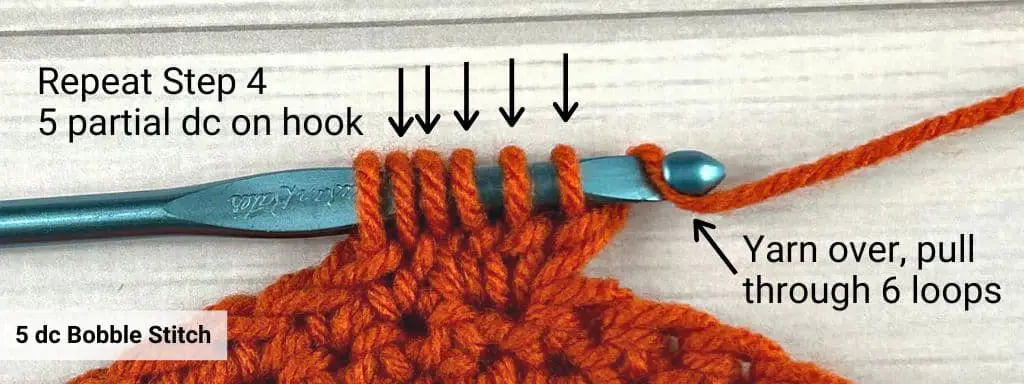
5 double crochet Bobble stitch: * Yarn over, insert your hook, yarn over and pull up a loop, yarn over and pull through two loops * repeat from * to * four more times (6 loops will be on your hook), yarn over and pull through all the loops
Let’s break it down into manageable steps.
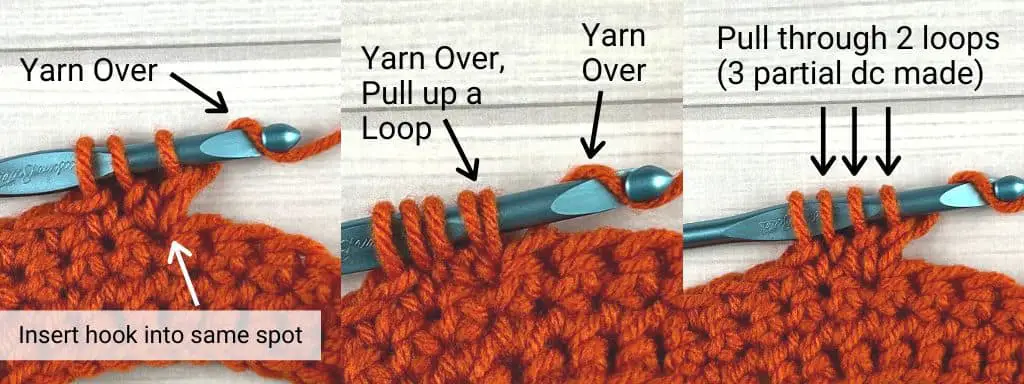
Step 1: Yarn Over, Insert Your Hook, Yarn Over
Begin as though you are going to make a regular double crochet stitch. Wrap the yarn around your hook, insert your hook through the fabric to the other side, and then yarn over again.
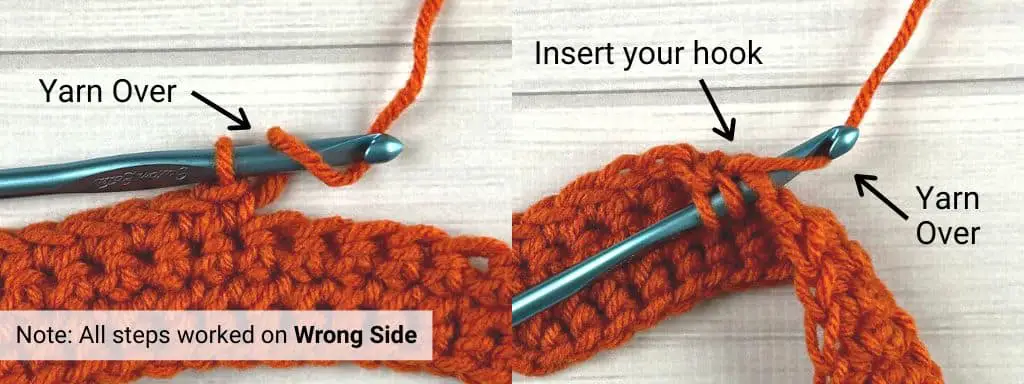
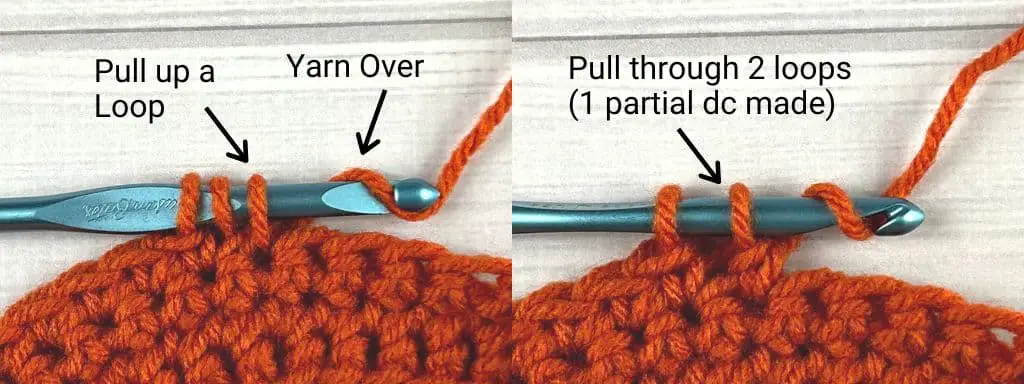
Step 2: Pull Up a Loop, Yarn Over, Pull Through Two Loops (First Partial Double Crochet)
Pull your hook back through to the front side and pulling up a loop. There are 3 loops on your hook. Wrap the yarn around your hook again, and pull it through two of the loops on your hook. This is where you will stop and begin working your next double crochet stitch.
Step 3: Repeat Steps 1-2 (Two Partial Double Crochets Complete)
Make another partial double crochet into the same spot. Yarn over, insert your hook to the other side, yarn over and pull up a loop. Then yarn over again, and pull through two loops on your hook. When you’re finished, you will have 3 loops on your hook.
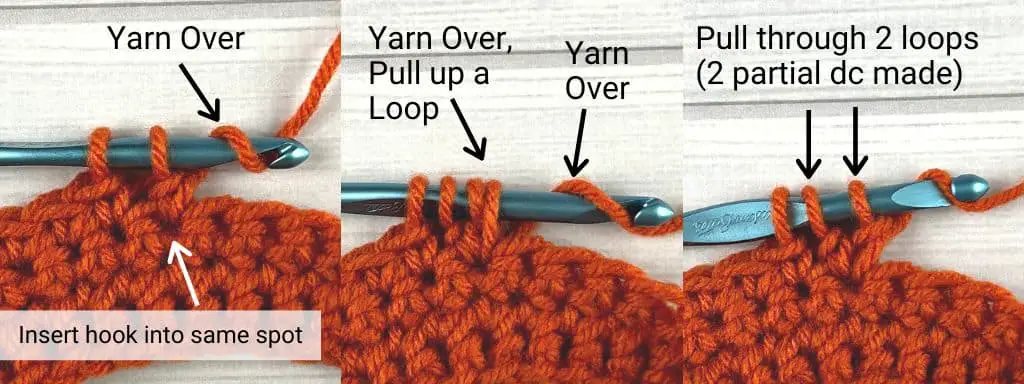
Step 4: Repeat Steps 1-2 (Three Partial Double Crochets Complete)
Continue to repeat the beginning steps, and again, insert your hook into the same stitch that you started with.
Note: If you need to make a 4- or 5- double crochet bobble, jump to step 4b and 4c below. Do not complete step 5.
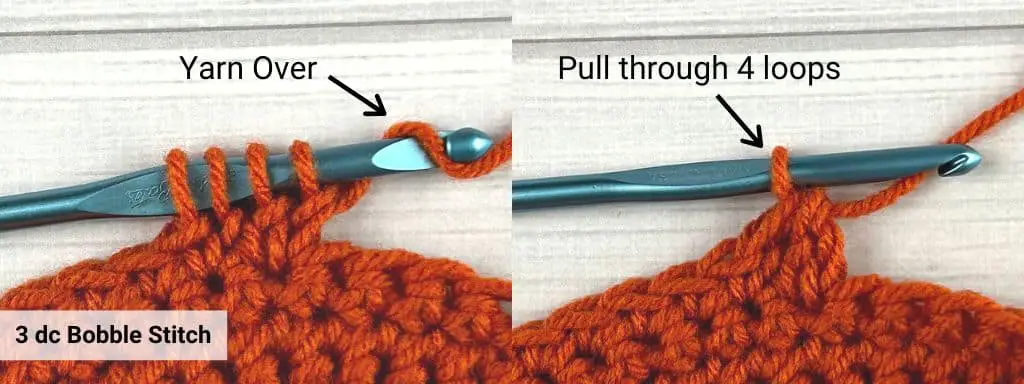
Step 5: Yarn Over, Pull Through All Loops on Your Hook
To finish up the bobble stitch, yarn over one last time and pull through all the loops on your hook. You have completed your bobble stitch. Yay!
If you take a peek at the other side of your fabric, you might be confused at the lack of a bump. Don’t forget that you won’t see the true beauty of the bobble until you make the next stitch (usually a single crochet). Do that first, and then check out the bobble. Better right?
Step 4b: Repeat Steps 1-2 (Four Partial Double Crochets Complete)
To make a bobble with four double crochets in it, continue those first two steps one more time. Don’t forget to insert your hook into the same stitch as you’ve been working.
Step 4c: Repeat Steps 1-2 (Five Partial Double Crochets Complete)
For a bobble that contains 5 double crochet stitches, repeat steps 1-2 above one more time before you pull through all the loops.
Video Tutorial
While the photos show you how the stitch looks at different points in the process, I have a video tutorial that will walk you through each bobble version to clarify this stitch a bit better. Watch the VIDEO TUTORIAL.

Common Questions About the Bobble Stitch
What Does Each Size Bobble Stitch Look Like?
As you increase the number of double crochet stitches used in your bobble, the size of the bobble becomes more prominent. Depending on the look you are going for, or what your pattern calls for, you can use any version. I recommend testing out a few different versions before you get started with your project to see how it works up in your yarn.
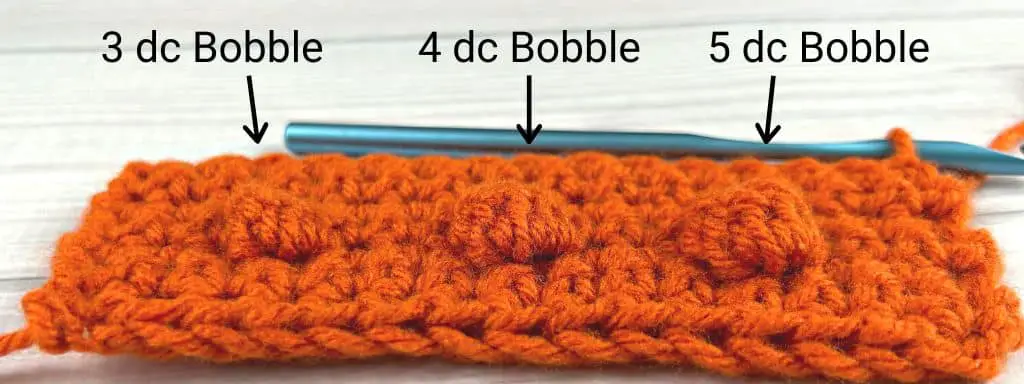
How Do You Transition to the Second Row of Bobble Stitches?
Because Bobble stitches are worked on the wrong side, you probably won’t find a pattern that has bobble stitches in consecutive rows. So after you make a row with bobbles in it, you will typically have to make one row of single crochet stitches on the right side before you can make another bobble stitch row.
How Do You Finish Off a Row of the Bobble Stitches?
Bobble stitches get their pop when you make a single crochet (or other shorter stitch) next to them. That’s what secures the bobble in a squished form, which leaves it raised for texture.
What Are the Variations That Can Be Done With the Bobble Stitch
Bobble stitches aren’t typically done in variations like front loop only or back post stitches. The variation comes with the number of partial double crochets you include. I’ve shown you three examples, but you could try making bobbles with more than five double crochets and see if you like it!
The Last Thing You Need to Know About the Bobble Stitch
Crochet bobble stitches are a fun way to add texture to any project. Just be sure you are working on the wrong side of your work, as bobbles are not a two-sided stitch. Don’t forget to experiment with each version to find out which one you prefer for your crochet projects.
Want more practice with the bobble stitch? Check out these fun crochet projects
I’d love to see what you make with the crochet bobble stitch! Connect with me on Facebook and Instagram and show me your work. To learn more crochet stitches, be sure to visit the stitch tutorial library.


Leave a Reply